I’m asked many times why wiringPi has its own pin numbering scheme for the Raspberry Pi, rather than use the native hardware pin numbering (which is can also use, along with the physical pin numbers)..
The answers are simple…
- Firstly… In the very first published diagram of the GPIO connector on the eLinux wiki site the user-usable GPIO pins were numbered zero through seven. So I thought that was fine and I added mappings into wiringPi to make them do just this – after all, in any program you could now run simple loop from 0 to 7 to access all pins – e.g. to light up 8 LEDs. (Note that this diagram has since been re-drawn and no-longer numbers them from 0 to 7)
- Secondly… To try to encourage Arduino users over to the Pi – wiringPi makes it somewhat easy here too. In Arduino land, we don’t talk about port C, bit 7, we talk about “pin 13” (and in almost All Arduinos “pin 13” is the notification LED – the ones you use for your very first “blink” program – the underlying Arduino wiring library hides the actual hardware port and bits from you).
- Continuing on… When the Pi hardware was changed, the foundation re-provisioned 3 pins on the original 26-way connector. If you stuck to wiringPi pin numbers you were fine and you didn’t need to change your programs as the pins numbers didn’t change, but if you were using the native pin numbers, then you needed to work out what board revision you are using, then re-map the pins in your own code.
So there you have it. That’s why wiringPi has 3 pin numbering modes. Please read the fine manual for the ways to use each mode.
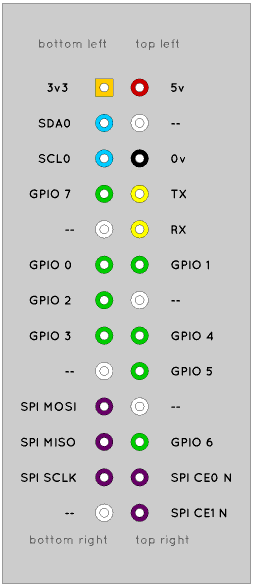
Original GPIO pin diagram:
This is a copy of the first GPIO pinout diagram. It was published on the elinux.org wiki site on the 13th March, 2012. This is what I originally based my wiringPi pin numbers on.