
So as well as technology, I love baking – to the extent that I bake stuff to sell with all the shenanigans that goes with that. Local authority inspections, food hygiene certificates, insurance, blah….
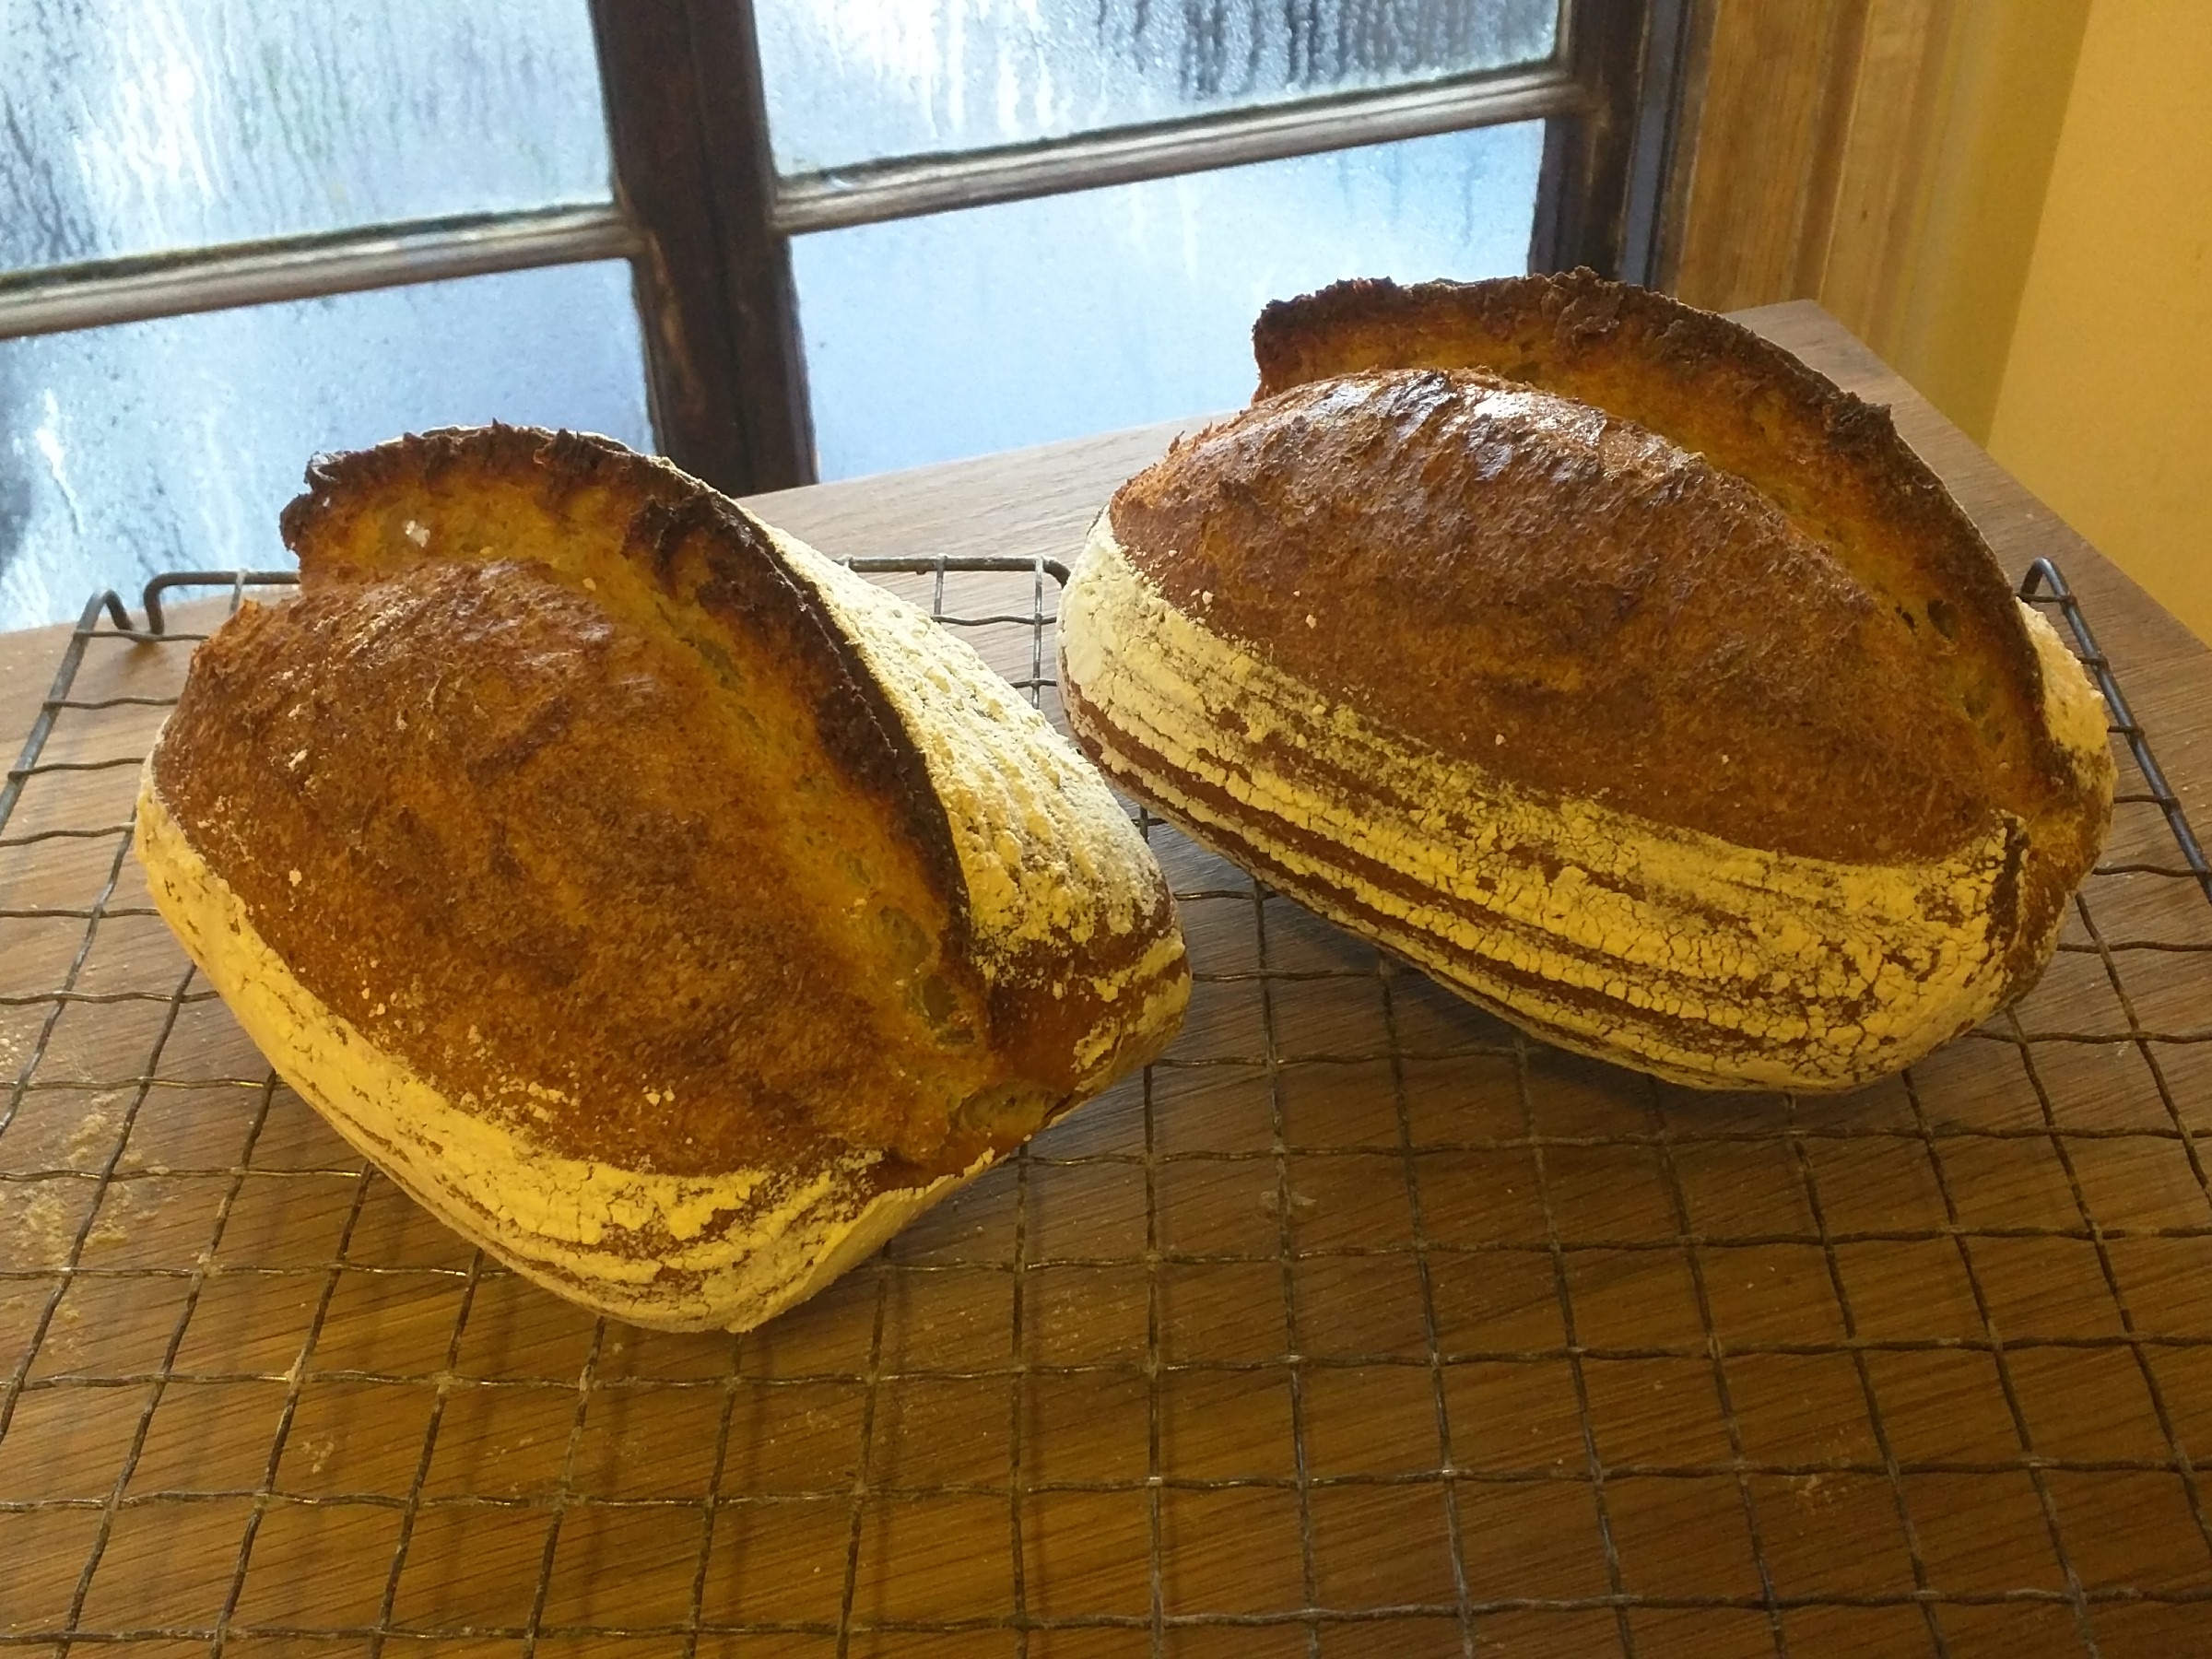
Some bread I made … (Devon Honey Spelt if interested)
And then one day I foolishly thought it might be good idea to combine my love of geekery and technology with my love of baking… And stuck a Raspberry Pi to the side of one of my ovens. I did have a couple of reasons to do it (other than because I can) one is to cook meringues at a cool 60°C and another is to bake some bread that requires a gently cooling oven from about 200°C to about 100°C over a period of about 6-10 hours. I’ve not done that yet, but it’s on the cards. Meanwhile…
Here it is:
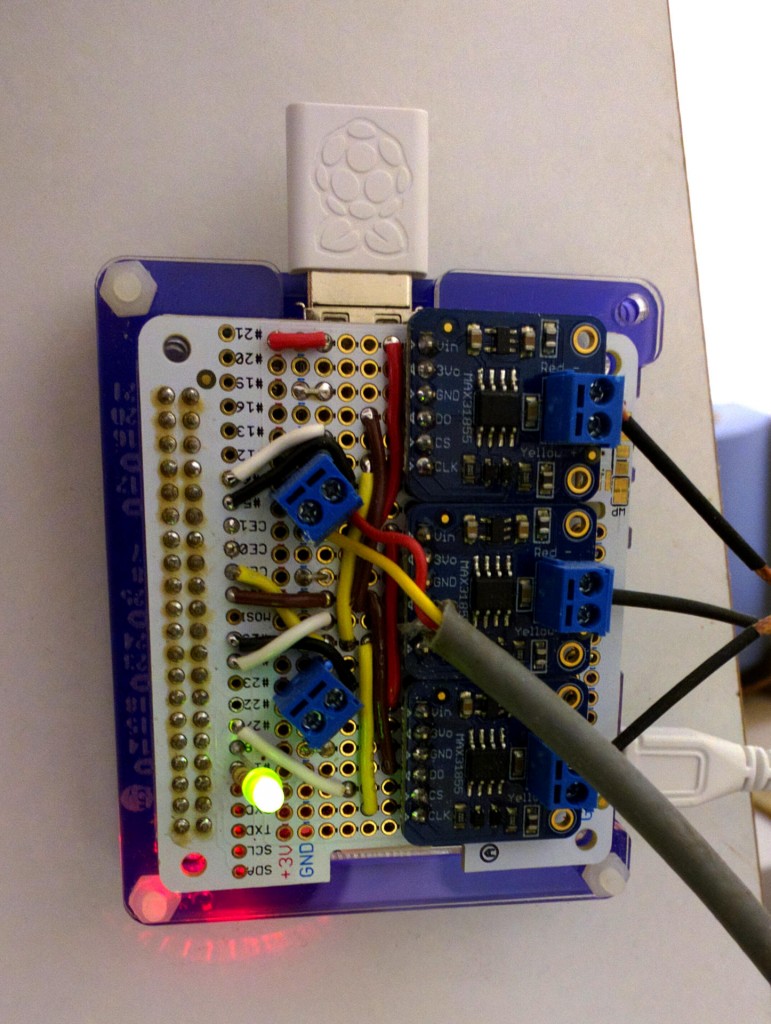 So that’s an A+ model in a nice Pimoroni case with an Adafruit perma proto-plate on-top with some “stuff” to control the oven stuck on the side of the oven with some Blu-Tack for now. It’s powered up – stays online all the time now (I had issues with an old Wi-Fi dongle, replaced it with one of the Foundation approved ones and it’s been rock-solid since then). The three thin cables go to thermocouples inside the oven compartment and the grey cable goes to a SSR (Solid State Relay) inside the top of the oven. The Green LED is actually a bi-colour LED wired across 2 GPIO pins with a resistor. It can be off, green, red or if I could be bothered to write code to alternate the pins, a sort of muddy yellow. I just use it to indicate the heater being on (red) or off (green).
So how do you control an oven? Lets break it down into steps. One thing I was interested in was just how rubbish my oven really was. I already knew where the hot spots were (the bottom of the oven is hotter than the top – who’d have thought that?) and how unevenly it cooked as well as just how approximate the temperature dial was (plus or minus a fruit cake) so the first task was to measure the temperatures. Most of the temperature sensors you see people plugging into the Pi are only good to about 120°C or thereabouts. I wanted something that was good to 300°C or more. (This oven maxes out at 250, but I have others that go to 300…)
Thermocouples are the ideal thing here, but they’re somewhat different from your usual semiconductor sensor. They work by exploiting the fact that when you put 2 different metals next to each other they will generate a voltage. A tiny voltage, but a voltage none the less. It also turns out that the voltage varys in a reasonably linear way according to the temperature. So all we need is to plug the thermocouple into a suitable amplifier, digitise the result and read it into the Pi. This is somewhat simplified and you’ll hear people bleat on about “cold junction compensation” blah, blah blah, and other stuff, but the trick here is to use a chip that does all that for you. The MAX31855 is such a chip and Adafruit have a neat little breakout board which has the chip on a breakout board with terminals for the sensor and pins to hook up the digital side. Being based in the UK, I bought them from a UK distributor of Adafruit products, SKPang along with some Type K thermocouples. (Thermocouples come in different types depending on the materials used and so-on).
So after testing these and fixing the wiringPi max31855 driver I soldered some onto an Adafruit perma proto-plate and tested it.
Now here’s a little problem – I wanted to use three thermocouples. Great. The MAX31855 is an SPI device. Also great. The Pi only has 2 SPI channels. Not so great. Ah well. My solution was to use 3 other ordinary GPIO pins as the CE lines to the 3 devices. This works well.
So why three sensors? Initially I was interested in just how bad the oven temperature varies over the interior, then I thought about redundancy – and here’s an issue: Confucius says: “Man with one thermometer knows exact temperature. Man with 2, never sure …” Well, maybe he didn’t, but you know what I mean. Fortunately there are some fairly standard ways of dealing with this. One way is a simple “voting logic” approach. You read the sensors and you pick the 2 that are closest then average those 2 to get the temperature. You also apply some heuristics to check the third sensor to see just how far away from the average it is – and can then use that information to print an error message if it goes too far away, or just log it for another day.
This worked well, but it wasn’t without problems – when the oven got to a stable temperature, the odd-sensor-out changed and the resulting 2 sensor average jumped a little – not much, but enough to cause some issues with the control loop. In the end I dropped it and just averaged all three sensors and built in some heuristics to check for a sensor going too far off-course. This works well. There are other algorithms to read and sense and generate the oven temperature, but for a little hobby project this is good enough for now.
So I started to produce graphs using the existing mechanical/capillary tube sensor. These sensors work by having a sealed tube and a sensor with a spring behind it. The power of the spring is determined by the rotary knob. When the sensor pushed hard enough the switch inside the knob clicks and the heater turns off…. Until it cools down a little, then the oven turns back on again and the process repeats for the duration.
This is how the majority of domestic (and some commercial!) ovens work. It’s a somewhat crude system, but it’s tried and tested and been in-use for decades.
So just how crude? Here is a graph:
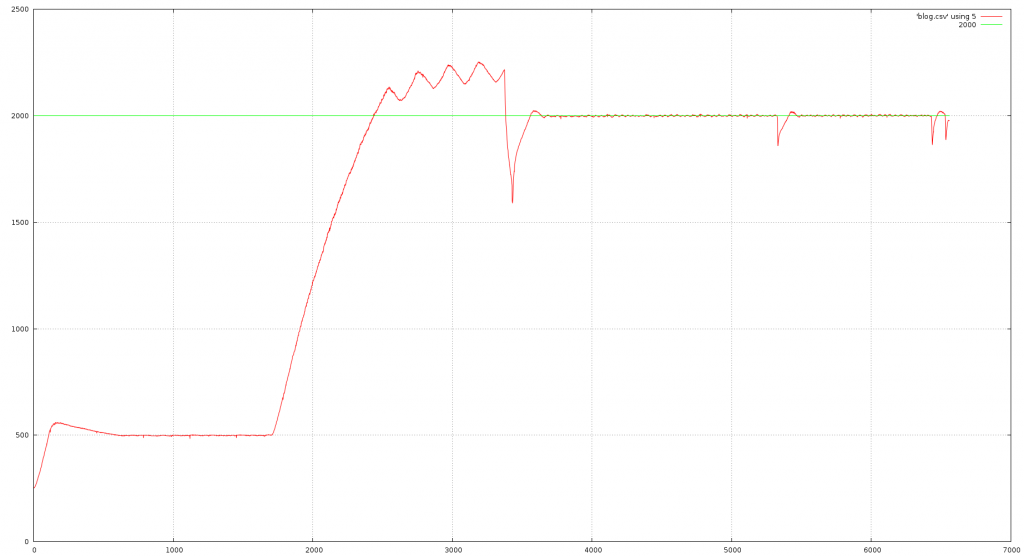 This is a single run of the oven. Y Axis is temperature in °C * 10 and the X axis is time in second.
I started with the Pi set to 50°C and ran it for for time (half an hour or so) then I used the ovens mechanical controller to take it to 200°C … As you see it’s somewhat hotter than 200 and lots of wibbly wobbly temperature swings. After 20 minutes of this, I turned the ovens controller to zero and opened the door for a few minutes, then told the Pi to control it to 200°C and closed the door. It gets up to 200°C fairly quickly, overshoots by a degree or 2, then settles down – it’s better than +/- 1°C at that point.
The next little dip is when I opened the door to load up a tray of mince pies – well it is Christmas time after all.. There is another dip about 15 minutes later when I opened the door to turn the tray, then a couple of minutes after that when I took the tray out and turned it all off.
 One of the mince pies that it cooked during that run.
Read more about my thoughts on mince pies here …
After initially measuring the temperatures and being somewhat surprised at just how crude (and inaccurate) the existing controller was, the next step was to control the oven. The oven heater is 2.2Kw and 230v, so this isn’t really anything you want to fiddle with unless you are 100% confident you know what you’re doing. My background from 25+ years back was factory automation, designing & building robotic transfer mechanisms, controlling machine tools and so on. I’m comfortable with my ability to control stuff like that, so controlling a simple heater ought to be relatively easy.
And it is. But DO NOT try this yourself unless you are fully confident of you own ability. I will not present any photos of what my system looks like inside the oven – if you want to do this, then you are on your own, however I will write about what I used and how I did it, but no code, sorry. (It’s written in BASIC, anyway)
I chose an off-the-shelf SSR (solid state relay) unit. I went for a 40 amp device with heatsink. These devices have been about for a very long time and are not that efficient and dropping 2v at 10 amps is a power loss of 20 watts which you have to get rid off – inside an already warm cavity above the oven chamber. The heatsink is bolted to the frame of the oven and the high voltage terminals wired across the existing thermostat switch. This makes it simple to use – and with the Pi turned off I can still use the existing thermostat.
The low voltage side of the SSR is connected directly to the Pi. This is nothing more than a resistor and LED (inside the SSR) so all the Pi has to so is provide 3.3v and a few milliamps to turn of the LED that forms part of the opto isolator inside the SSR.
An advantage of the SSR I used was zero crossing detection. Simply put the thing only turns on or off when he mains cycle crosses zero – either way up or down. The advantage of that is that it vastly reduces electrical noise. No clicks on nearby radios. A side effect of that is limiting the minimum time I can turn the power on for – one half cycle or (at the UKs 50Hz) a 100th of a second. In practice this isn’t an issue as the minimum time I’m going to turn the heater on for is in the order of 1/10th of a second.
More on safety
The oven has a built-in over temperature cut-out and additionally has a simple mechanical timer. I use the timer – wind it up to 100 minutes so that if the worst were to happen and it did overheat and the cut-out didn’t trip, then hopefully for no more than that time.
Now there’s just the little issue of controlling the oven temperature… There are many standard algorithms but the usual one is often called PID or three-term controller. PID stands for Proportional (multiply the error by a constant to get the new output), Integral (looks at the magnitude and duration of the error) and Derivative (look at the rate of change of the error). The error here is the difference in measured temperature against the desired temperature. There is some interesting calculus to execute the PID control, but in a program its really only 3 lines of code.
A down-side is that a PID algorithm needs to be tuned. There are several standard ways to tune the algorithm – most involve sitting down and working through the parameters, tweaking one at a time and checking the graphs and there are some auto-tune algorithms too. I adapted an auto-tune algorithm, but it didn’t work very well, so I sat down and made a few approximations to the tuning parameters then tweaked them after a few real runs. It’s not yet perfect, but more than good enough to bake a sponge cake. Currently it overshoots by a degree or 2 (this is more apparent at lower temperatures) but it isn’t an issue whatsoever.
I suppose some of you are still asking: Why? And the answer is because it’s fun and because I can.
Look out for another exciting episode of my Pi controlled oven when I’ll be doing a video and showing you how to make a simple loaf of bread…