Preparation takes place usually at about 3-4pm. A few hours later round about 7:30 to 8pm, it’s time to mix and knead up the doughs which are then left to ferment overnight.
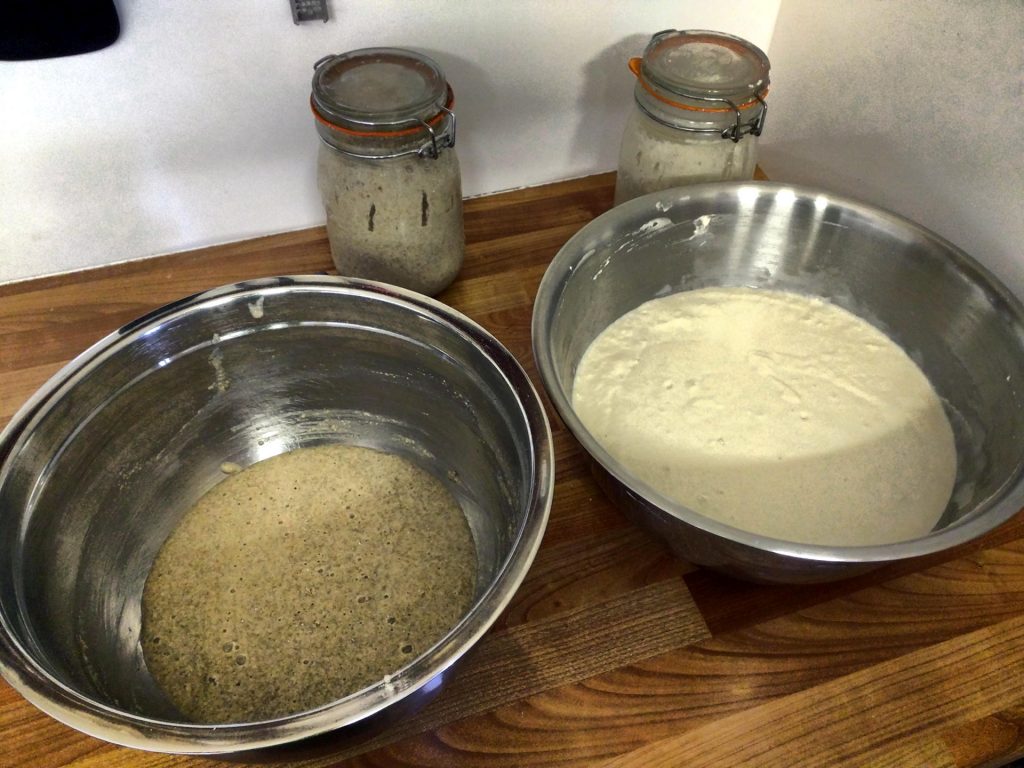
These are the sourdoughs after 4 to 5 hours. They’re nice and bubbly and ready to use.
Now, it’s mostly a matter of weighing up the water and sourdough, tipping that into the mixer, then the flour – giving it a good mix, finally adding in the salt for a few minutes more, lifting it out the mixer and repeat the process…
This is the spiral mixer. It’s single speed with a fixed head, so getting the dough out requires a certain knack, as does cleaning it. Spiral mixers are very common – this is an Italian make and you’ll find these used in pizza parlours the world over.
The rye is mixed by hand – only a few loaves usually and it’s a very wet and sticky dough. Gluten doesn’t develop in rye the same way as wheat, so there’s no point trying to knead it really. Keep it wet with a sourdough starter and it’ll be just fine. I add caraway seeds, malt and molasses to mine.
The overnight white dough that I use for the cheese breads is an olive oil based dough with just a fraction of the normal yeast added (it’s not a sourdough). This is mixed in a small stand mixer that I was able to get a nice dough spiral hook for. These are much better than the usual hook you get with them.
After that, it’s just a matter of getting the liquid ready for the next mix/knead in the spiral, emptying it, dividing the dough into lumps that will fit the containers, splitting up the rye into tins and trying to keep sane…
This is a lump of dough taken out of the spiral mixer and left to rest on the bench while I load it up with the next batch. I try to keep the mixer going all the time so I make sure I have everything ready to load it with as soon as I take one batch out. I also try to plan the loads to avoid too much of one type of dough getting into the next batch, so the seedy ones are often last with the plain white (when I do them) first. This day I had 3 lots through the spiral mixer – my usual sourdough which is a mix of white, wholemeal and rye, then a seeded mix, then the 100% wholemeal. I’m not overly concerned if a few seeds get into the wholemeal – I stopped using the main allergen one a long time ago (sesame seeds)
This is a load from the mixer that I’ve weighed and divided into two – the smaller on the left will make exactly 5 loaves and the larger on the right will make 7. My largest tub will only take dough for 10 loaves, so the split is needed.
Here is some multiseed in the mixer. I get the dough formed first, then add in the seed mix – I make it up myself and is a mix of poppy, linseed (brown and golden), pumpkin and sunflower seeds. I used to buy a commercial mix that included sesame but even though my labels were clear on what was in them, I decided to drop sesame a while back due to some very public issues involving a fatality due to a mis-labeled product. (Pret a Manger)
Last through the mixer is the wholemeal. Here it’s had the initial mix and I’ve just thrown the salt into it. (It’s a bit of a wet mix, but not as wet as the rye!)
While all the machine mixing is going in, I find a few moments to scale out the rye into tins. These stay in the fridge overnight and rise slowly there and are first in the oven in the morning.
The dough is moved into the tubs as it’s mixed and kneaded and gets left there overnight. Now it’s clean and tidy the place up, have some supper and off to bed!
This picture really belongs in the next post as it’s tomorrow morning, but I’ve put it here to compare with the one above. You can see how much it’s all risen. The left 2 tubs are the white olive oil dough and the wholemeal dough – these are both made with dried yeast, although only a fraction of what you’d typically use for a standard 1-2 hour process.
A few of you may know that I do the home artisan microbakery thing. My pages for that are over here: http://moorbakes.co.uk/ but in these posts I thought I’d show you a day in the life …
I make mostly sourdough breads for sale directly and in a few local community shops. It all started as a hobby, then developed a bit more as a sort of therapy to help with some health issues, then it got out of hand and I was doing afternoon teas for weddings, office party buffets, local farmers markets and I ventured into the lovely world of patisserie, however that all got too much and today I’ve scaled it back down a little so I can concentrate on other things – notably some IT projects, weight loss consultancy (to help others undo all those years of eating too much bakery goodness!) and give a little time to an older passion; horse riding (and perhaps more on that later)
All in a days work
A bake is split into three parts over two days – preparation of the sourdough starters, mixing the dough, then (the next day) the final shape/proof/bake.
Preparation
This starts mid-afternoon the day before the breads are baked. Clean and sanitise the work area and fetch the starters from the fridge.
Sourdough?
Sourdough is just a fancy name for a natural yeast culture. Some may suggest the name refers to the old “Sourdough Joes” who roamed the wild west, some may suggest it’s due to the presence of lactic and acetic (and maybe other) bacterias that come along for the ride giving it a midly sour taste and some may think it refers to a particular style of bread – whatever – to me, it’s just a natural, slow acting yeast.
I keep 2 different types in my fridge: A white wheat based one and a wholemeal rye based one. They don’t have names – they’re just my starters.
I measure them out into big bowls and add flour and water to make enough starter for that evenings dough mix. The jars are then topped up and left out with the big bowls until later that evening. This gives the left-over starter in the jars a chance to start again and get active and bubbly before being consigned to the dark recesses of the fridge until they’re needed again.
As I type this my starters are about 8 years old. Maybe older. I got the rye starter from someone who’d had it for 5 years and they got it from someone who’d had it for 20 years. What does that mean? Nothing really, only that we’ve been able to keep something going for all that time. I know that some people are proud of how long their starters have been living, but the reality is that it’s really “triggers broom” syndrome. All the living stuff reproduces and dies off in a matter of weeks, so it’s really unlikely that what’s in the jar today contains not a single molecule of what was in the jar when I started them. (And every now and then, I transfer some to a new, clean jar and the old ones go into the dishwasher)
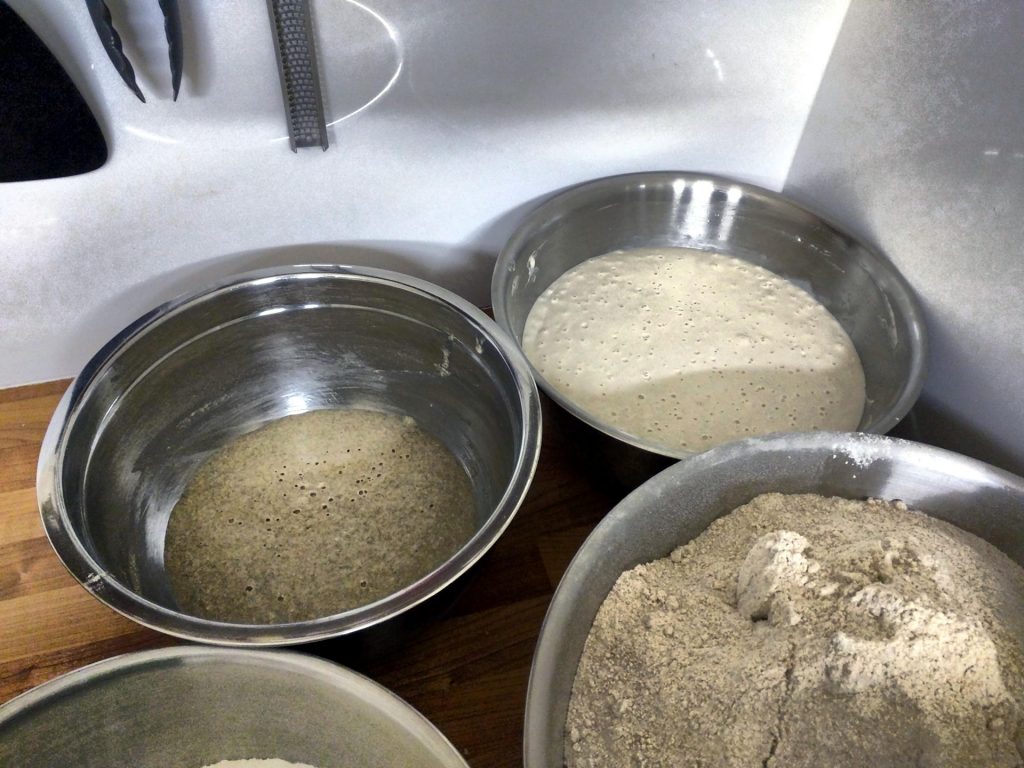
That’s the rye on the left and wheat on the right. The bowls are covered and left for a few hours and I get on with more preparation which involves weighing out the flour mixes for the mixing that evening.
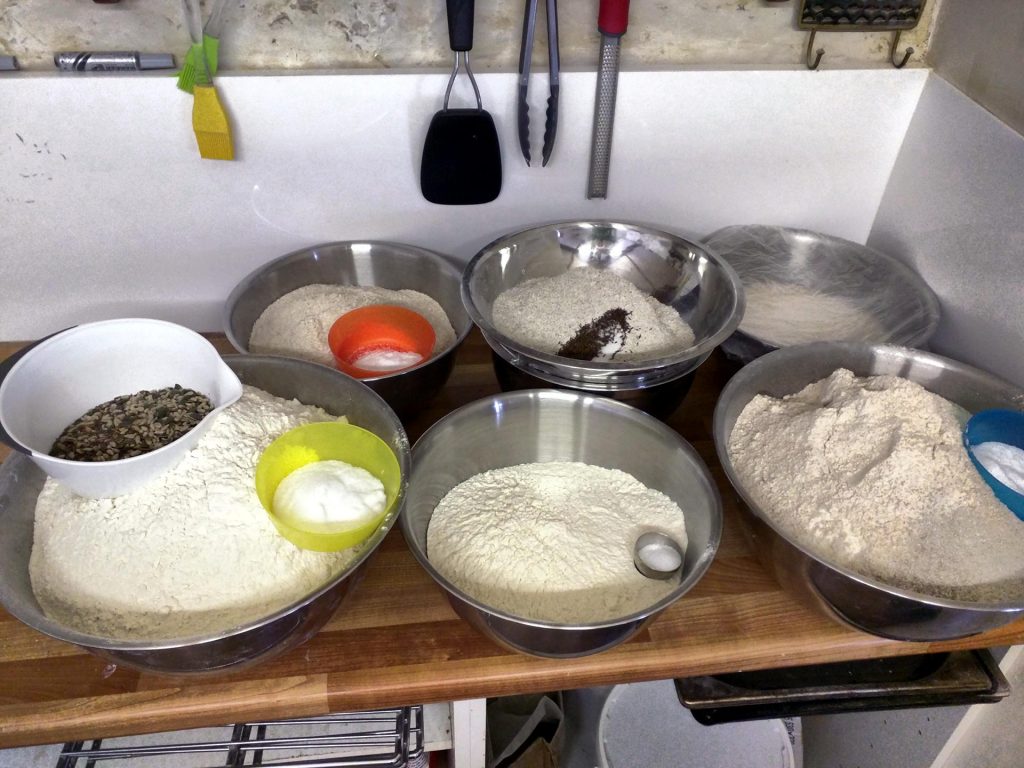
That’s most of what I need for that particular evening. A batch of multiseed loaves, some white dough,wholemeals wheat and my Moorbakes Sourdough. The rye flour, etc. is on-top of the rye starter bowl and I use shower caps for the other starter.
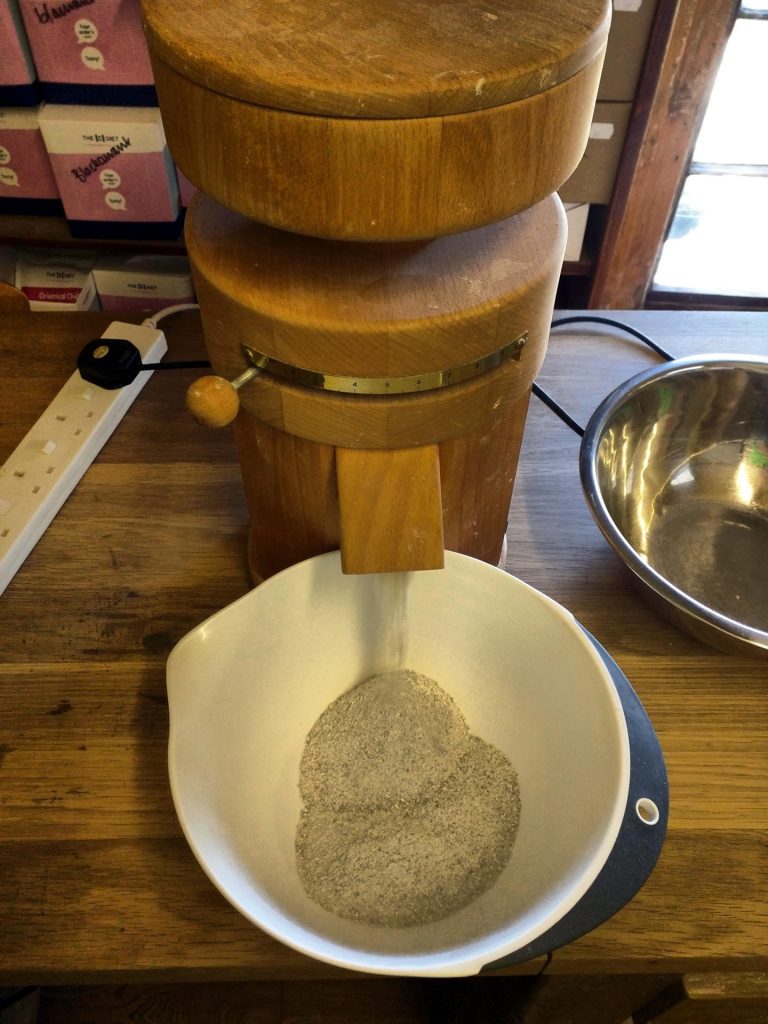
Speaking of rye… I mill my own, and wheat sometimes too. I get organic rye (and some wheat) directly from local farms wherever possible. I use organic ingredients wherever possible, although thanks to a cartel of half a dozen or so “certifying agencies” in the UK I am unable to call my breads organic unless I pay them a lot more money than I’ll ever make from selling my breads, sadly.
So that’s about it, however on that particular day (it was a Wednesday) I also chop and grate some extra strong cheddar cheese for the cheese breads I make on Thursdays. Total time is about an hour, so now I clean any mess and get on with other stuff until later in the day.
I’ve just watched Dave Murrays demo of his “Vera” video card moving some balls round the screen. Initially confused by how it was working, but now understand that it’s to do with the way the colour works in text-mode, so there is a separate “shadow” block of memory that controls the foreground and background colour for each character position.
So in an otherwise idle 10 minutes, for a bit of fun, I paused his video, looked at his code and re-write it to work in BBC Basic and ran it on my Ruby board:
I did it more out of curiosity and a bit of fun than anything else – I’m also experimenting with screen capture software, rather than point a camera at the screen.
the graphics are still generated here by sending commands from the Ruby board via the serial interface to the graphical terminal on my desktop (The ‘terminal’ is a C program using the SDL librarys running under Linux – it listens to the serial port and interprets the usual BBC Micro/Acorn MOS VDU commands)
You can see my source here: https://unicorn.drogon.net/balls.txt it should run on any BBC Micro. (and it’s not the best, but was done quickly – remember the fun part!)
Ps. If anyone knows anything better than “RecordMyDesktop” that runs under Devuan Linux then do let me know, thanks!
Pps. Yes, this is on my new 65816 board – more on that in a later post!
Ultimately I wanted a 65C816 system but initially settled on the 65C02 for many reasons. One was that round about the same time another ‘816 project was announced (and subsequently a 2nd, and as of today a 3rd!) so I felt that getting back into the 6502 via my own board then buy into one of the ‘816 projects would be the way to go…
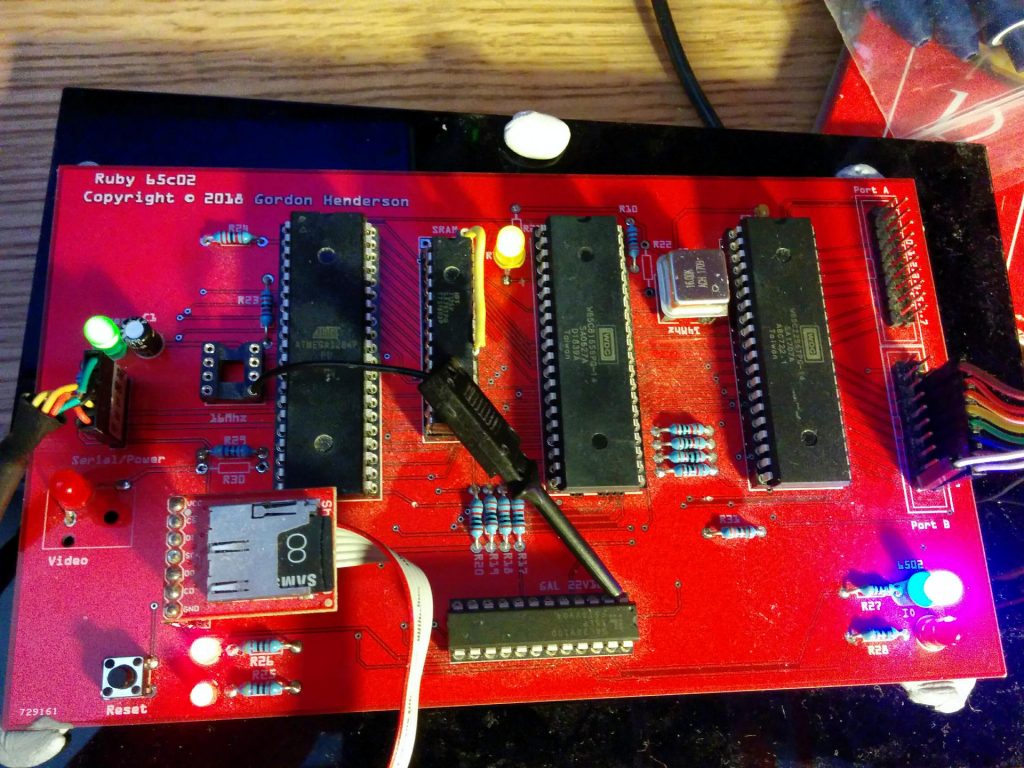
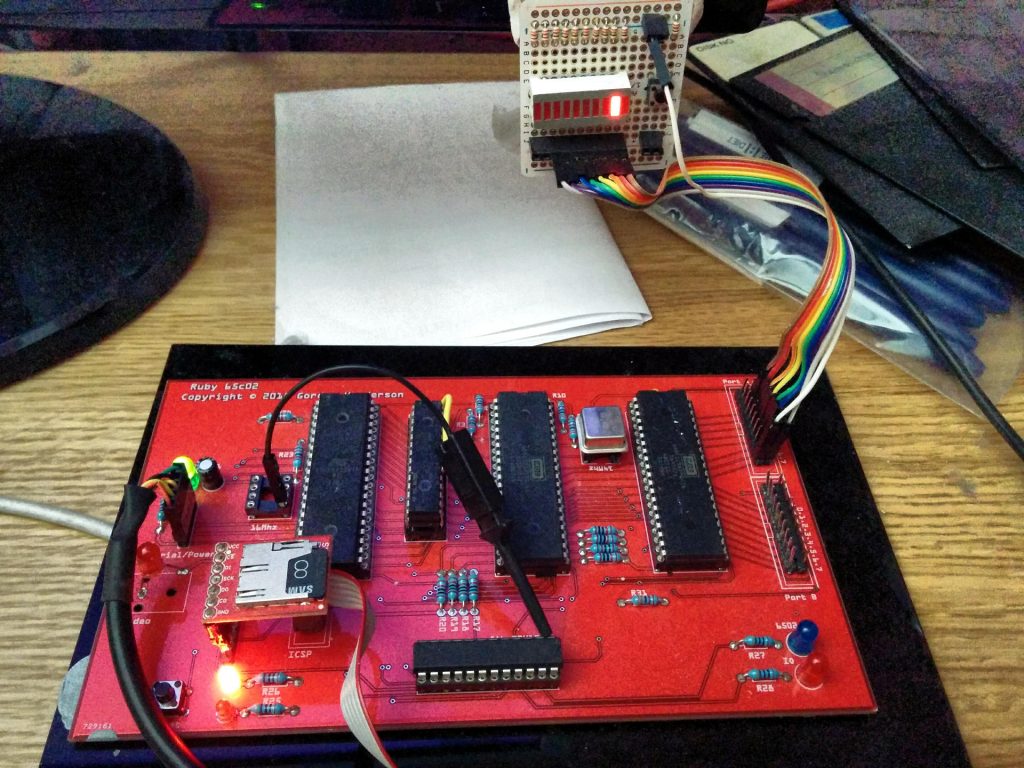
But things change. The first ‘816 system (Stefany’s Foenix) wasn’t to my liking, then the next one – Dave Murray’s Commander X16 has been changed to a 65C02 system. The last ‘816 system – Neon816 is somewhat curios, so I’ve decided to go with my own board for now, so to kick that off, I replaced the 65C02 with a 65C816 on my Ruby board. At the same time, I took the opportunity to make a few optimisations (ie. I removed some resistors that I don’t need because the ATmega host processor has internal pull-ups and with a few software tweaks there can eliminate some unneeded components.
Here’s a photo:
The Yellow LED is the E output from the 65C816 – On is Native mode, off is “Emulation” mode – which is how the ‘816 comes up at power on, so it can run all 6502 code at power up. (This is the default for all 65C816 systems)
Other than a few resistors I’ve removed – I had to add one resistor which goes on pin 3 which is the phase 1 clock output on the 6502 (which is never used in new designs), but is the /ABORT input on the 65C816 which needs to be pulled high. (That resistor is under the board, along with the LED current limiting resistor)
The flying wire is taking the 16Mhz clock from the 65C816 side into the ATmega side and one day I’ll buy more 16Mhz crystals!
(And yes, I’m running the 65C816 at 16Mhz)
So I’m now in the process of laying out my 65C816 board – it’ll be essentially the same as this, but with 512KB of RAM rather than 64K. It will take a 65C02, but that will only be able to see the first 64K of RAM. The ‘816 will be able to see the full 512KB. I have a new bus/IO system planned which I’m testing on the current Ruby board – watch this space, as they say…
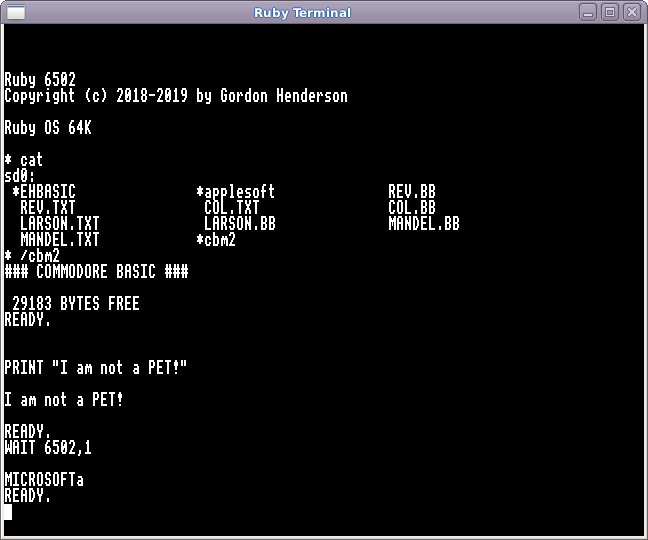
This is just a short follow-up to the last post; Comparing BASICs… There, I talked about the differences between BBC Basic and what was effectively a Microsoft BASIC (EhBASIC), however I decided to take a few moments and have a proper look at the published MSBASIC sources to see if I could make it work on Ruby.
And an hour or 4 later – yes. Success with the Commodore version 2.0 – obviously without the “KERNAL” part which is the Commodore equivalent of the Apple II Monitor or the Acorn MOS – what we might call a BIOS today.
The main thing that KERNAL gives a Commodore system (PET, Vic20, C64) is the screen handling – this lets you cursor up to a line, edit the line on-screen and simply hit the return key to (re) enter it into your program.
The MS sources have a simple line entry system with conditional assembly for the many different systems MS sold their BASIC to – some vendors changed it, some were supported directly. I changed it to use the RubyOS standard “getline” code which gives me line editing, history and easy access to the RubyOS star commands.
Character output was similarly changed to point to the RubyOS routines, however there appears to be some issues regarding CR+LF handling that I couldn’t quite get right, so I just edited the code to make it work.
This is MSBASIC level 2, assembled for a Commodore system running on Ruby displaying the MS “Easter Egg”:
I loaded and ran the same mandelbrot program as before – it took a few seconds longer than EhBASIC – I suspect due to it using a 5-byte floating point format, however it did work well.
Easter egg?
Microsoft added a little “Easter egg” into the BASIC 2.0 for Commodore – if you enter
wait 6502,1
then it would print MICROSOFT! on the screen. This didn’t work initially, then after wondering why it was crashing and after looking at the code I found that it poked the characters directly into screen memory – which is at $8000 in a PET, etc. … This is where I assembled the BASIC to load and run, so I decided to change the easter egg code to simply print it to the screen. A small complication is that it uses “PETSCI” codes which are obscured in the code to make it not obvious that it was there – I ‘fixed’ that for Ruby too. the ‘a’ at the end would be an exclamation mark on a real PET/C64.
Microsoft Source code
The sources for the 6502 version of Microsoft BASIC have been published for a number of years now and it seems that Microsoft aren’t doing anything about it, however that doesn’t mean it’s in the public domain, free to use and sell. Microsoft still holds the copyright to it so while I feel it’s fine for me to use it, adapt it for my own personal use, I’m fairly sure that if I tried to sell it I’d be in a somewhat sticky position, however if anyone else wants to have a look at the sources, then I suggest starting here:
I created a new target for it, but used the CBM2 target as a template for everything to try to keep all the Commodore changes and features. (Such as the Easter egg) The one thing I’ve not looked at is the file handling and while I’m sure I could make it work with the Ruby Filing System, I’m not sure it’s really worth it for now. (And also, perhaps selfishly I am wondering why I want to use such a relatively primitive BASIC compared to BBC Basic)
Ruby 6502 has been running well on it’s PCB for some time now and interestingly enough (and curiously!) during the past few months other 8-bit projects have sprung up…
This started probably about a year back when Dave, the 8-bit guy made a video talking about what his ideal 8-bit micro might look like – which in summary is essentially a slightly better Commodore C64 with possibly a 16-bit processor (The 65C816 rather than the 65C02)
Since then, there are three project that I know of in the public eye making just such a thing. The Foenix C256, The Commander X16 and the Neon816. I’ve been following these projects and in particular te Foenix one was really interesting to me early on as I had been looking for a 65816 platform to do something for myself, but in the time it’s come to alpha board testing, I’ve gone down my own route, however…
Anyway, in the Commander X16 group (on Facebook), I had a brief discussion about BASICs and offered to do a brief video on BBC Basic vs. a typical Microsoft Basic. C64 BASIC is Microsoft BASIC 2… MS wrote 2 BASICs for the 6502, both were used at the same time with the level 2 BASIC having a higher precision floating point and a few other things. From a published version of the source code:
; These are the first eight (known) versions of Microsoft BASIC for 6502:
;
; Name                 Release   MS Version    ROM   9digit  INPUTBUFFER   extensions   .define
;---------------------------------------------------------------------------------------------------
; Commodore BASIC 1     1977                    Y      Y          ZP          CBM
; OSI BASIC             1977     1.0 REV 3.2    Y      N          ZP            -        CONFIG_10A
; AppleSoft I           1977     1.1            N      Y        $0200         Apple      CONFIG_11
; KIM BASIC             1977     1.1            N      Y          ZP            -        CONFIG_11A
; AppleSoft II          1978                    Y      Y        $0200         Apple      CONFIG_2
; Commodore BASIC 2     1979                    Y      Y        $0200          CBM       CONFIG_2A
; KBD BASIC             1982                    Y      N        $0700          KBD       CONFIG_2B
; MicroTAN              1980                    Y      Y          ZP            -        CONFIG_2C
BBC Basic was first sold in 1981 on the early BBC Micros with the latest version (v4) being in-use in 1984. The main differences are that it’s much faster (almost twice as fast), integer variables are 4 bytes long and was designed to run on a more sophisticated operating system than the typical simple monitors of early systems. (There are many more differences than that though)
So back to the Commander X16 group – I made the video and it’s about 16 minutes long and here it is:
Just an update: After 4 weeks, my post was removed from the Commander X16 group because
1
Keep it relevant
Posts not specifically related to the Commander X16 project will be removed, even if they’re CBM etc. Please keep all posts relevant to the X16. This group is not intended for general retro tech.
I’ve not done too much with Ruby 6502 in the past few months, however I decided to get a PCB made up for it and I’m happy to say it’s working fine. Well, almost.
A few little notes on the PCB version:
It’s Red. Ruby is Red…
The clip and wire carries the 16Mhz signal from the 65C02 side to the ATmega side (Yes, I’ve still not bought another 16Mhz crystal!)
I’m using same 64K memory module I used in the stripboard version – the yellow wire is the chip-select of the top chip.
The SD card is on a level-shifter breakout board – which I had to extend as I oopsed the location of the ICSP header pins…
A 65C22 VIA which has 8 LEDs connected to which replaces the single 8-bit latch that I had on the last revision of the stripboard version.
The grey ribbon cable is the ICSP programming cable for the ATmega and the black cable is the same power and serial cable as before.
Video
I decided to give-up with the video output from the ATmega. Several reasons – one I made a simple mistake on the PCB – easy to fix with a single bodge-wire, however the main reason is that generating video took up about 70% of the CPU cycles of the ATmega so things like it’s serial port and the SD card based filing system went relatively slow. I have a plan B for video – more on that later. Not using video from the ATmega has given me 2 spare IO pins – one I’m using for the SD card “activity” LED, so I can see when the SD card is being accessed.
Filing System
This has been improved and speeded up a little. A simple block-level read only cache for some operations really helps, as did filling in some little bits like actually validating a filename… That came after a program crash left me with a file I could not delete with anything other than a disk block level editor … (so another utility needed to be written!)
The file system has a fairly standard unixy style open/read/write/close interface, so an interface shim was needed for the RubyOS/6502 side of things. It now supports most Acorn style MOS commands – OSFILE, OSFIND, OSGBPB and so on and translates these as required.
It’s not a BBC Micro!
However… What’s happened is that more or less without really intending this to happen, Ruby has become more and more BBC Micro compatible by the day. This has had some advantages, and some frustrations – I really wanted something new, however I’ve realised that writing something completely new from scratch as a little hobby project is a somewhat bigger challenge than I have the capacity for. The advantages are that I can run a lot of existing BBC Micro software – almost…
ROMs
The boffins in Acorn HQ made some brilliant decisions back then and the best one is that they separated the operating system from the “language”. The language being BASIC, Pascal, Logo, Comal, Forth and so on. These were normally in a 16K ROM and the BBC Micro had space for up to 4 ROMs plus the operating system ROM. The language (and subsequently utility and filing system ROMs) all occupied the same address space and the hardware and OS would page each ROM in as required. The term “sideways ROM” was used, and it wasn’t long before 3rd partys produced boards that could take more ROMs and even RAM which allowed loading of a ROM from disk so making it easier to load more ROMs without taking the lid off.
So a BBC Micro has 32K of RAM, 16K of paged (sideways) language or utility ROM then 12K of operating system ROM with the hardware IO tucked in there too.
Ruby currently has 64K of RAM with a small 256 byte region for hardware IO and another 256 byte region for communications with the host ATmega processor, however it works with the same memory splits and currently has space for 24K of language ROM, and just under 8K of operating system. I have assembled ehBasic to look like an Acorn language ROM image, also Applesoft and Tali Forth (which is a 24K application) The various BBC Basic ROM images “just work” completely unchanged.
Booting Ruby and entering BASIC now looks like:
Initialising Host processor systems
ruFs:
  Filesystem initialisation [41]
    ram: nvr: sd0: sd1: sd2: sd3:  [OK]

Ruby: Host ready
Press SPACE to boot 6502 or
  the ENTER key for interactive debug: Booting 6502
======================================================================

Ruby 65C02 running. Loading RubyOS: OK


Ruby 6502
By Gordon Henderson, 2018-2019

Ruby OS 64K

* help
RubyOS Commands:
  LS       CAT      DIR      CD       RM       MV       SPOOL    EXEC
  LOAD     SAVE     RUN      INFO     UPDATE   TYPE     DUMP     FTP
  MD       FILL     FX       MODE     KEY      TV       GO       HELP
  BASIC    ROM      LARSON   MEMTEST  REBOOT   EXIT
No application loaded
* basic
BBC Basic ... Loading @ $8000. OK: End @ $C000
>*fx 0

Ruby 6502 2.0
>*help
RubyOS Commands:
  LS       CAT      DIR      CD       RM       MV       SPOOL    EXEC
  LOAD     SAVE     RUN      INFO     UPDATE   TYPE     DUMP     FTP
  MD       FILL     FX       MODE     KEY      TV       GO       HELP
  BASIC    ROM      LARSON   MEMTEST  REBOOT   EXIT
Application loaded:
  BASIC [04] (C)1984 Acorn

>*cat
sd0:
  ehBasic                applesoft              test
>*cd /sd3
>*cat
sd3:
  bcplRom                basicRom               applesoft
  taliForth              b4                     fforth120
  rhBasicz               ROBOT-L                ROBOT
  bcpl.r                 b1                     b2
  basic3                 ehBasic                edit110
  M1                     mandel.txt             sieve.b
  foo.b                  MOIRE                  mandel.bas
  maze.bas               maze2.bas              ktest.bas
  forth                  M2                     M3
  MANDEL.BB              MANDEL-G.BB            m2.txt
  mandelx                foo
>
This has been copy/pasted from a serial terminal (minicom) connected to Ruby. If you’re familiar with the BBC Micro then you may recognise some of the commands. Lines above the ==== line are generated by the ATmega and those below by the 65C02. (Note the command-list – some e.g. TV do nothing but are there because some BBC Basic programs use it)
Text? Graphics?
Without the ATmega generating graphics what do we do?
Well… Due to the above mentioned separation of operating system and language, it’s easy to isolate the screen handling calls and emulate them over a serial interface. In other 8-bit system in the late 70’s and early 80’s “poking the screen” was a popular way to put characters and graphics on the display, but before memory mapped displays there were serial terminals. The DEC VT series, Wyse, Televideo, ADM3a and so on… And before them? We had thundering mechanical monstrosities – the TTY33 and many others.
Poking the screen on the BBC Micro, while possible, it was generally frowned on – you were supposed to use the operating system (Some games did poke the screen for speed though) What was even better was that the communication between the language and operation system for graphics was for the most part done using character based control codes. This was not new then – serial terminals had their codes to move the cursor, clear the screen and so on, and advanced graphics terminals (e.g. Tektronix) could draw lines, shapes and so-on, just by sending control codes. This was the approach taken by the BBC Micro. You want to clear the screen? Print a Control-L (decimal 12). Move the cursor? Print code 31, (control underscore) followed by the X and Y character positions and so on.
So commands in BBC Basic like CLS (clear screen) were relatively simple – in this case all it had to do was send Ctrl-L (decimal 12) to the output and the screen would be cleared. not only in BBC Basic, but other languages too. Pascal, forth and so on – clear the screen? Send Control-L and the operating system did the rest.
This has proven to be very easy to implement in Ruby – the actual 6502 side really doesn’t do anything other than pass the data up to the ATmega which then interprets it and either gathers more characters or passes it up the serial line to the minicom terminal running on my Linux desktop. I have currently hard-wired the generic ANSI terminal codes into the ATmega, so when it gets a Control-L to clear the screen it sends up the relevant codes (which happen to be ESC ] 2J in this case) and the screen clears. Similarly for other codes to move the cursor (e.g. PRINT TAB(X,Y); ) and so on.
Just doing this has allowed some text based games and utilities to work with relative ease.
Graphics?
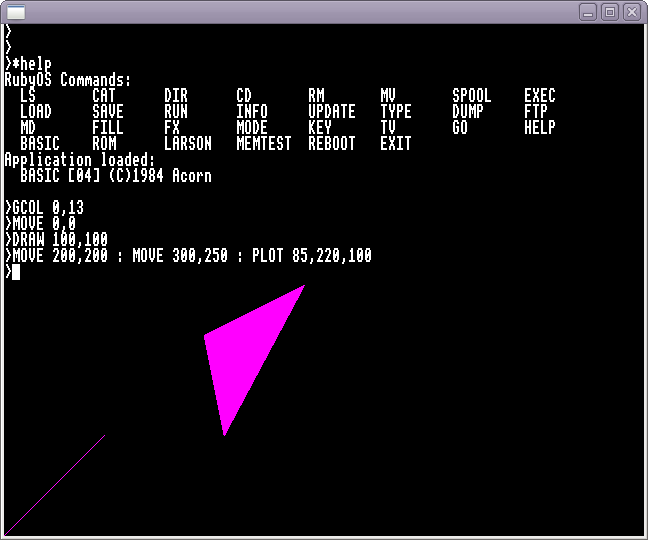
Graphics on the BBC Micro followed the same format – send control codes to the display to change colour, plot a point, line, triangle or other shapes. It may seem inefficient, but remember that in a BBC Micro this was all done in-memory rather than over a serial line, however when translated into serial commands, it’s still not that slow. There is a slight down-side though – minicom – the text-based terminal program I’m using doesn’t support graphics. It’s text only… The solution? Write a new minicom using a graphics based back-end.
Fortunately, some years back I wrote my own BASIC interpreter… For that I needed graphics and I used the SDL library to give me easy access to graphics on a Linux PC, so I used the graphical back-end to this as the basis for my new “RubyTerm” program and off I went. I made some minor changes to the ATmega code to make it recognise either an ordinary ANSI text terminal or RubyTerm so it could pass the codes transparently to RubyTerm and let that handle the decoding.
This result is quite nice and although not complete is providing a good basis for something to work on:
That demonstrates simple text output, then GCOL 0,13 selects colour 13 (Bright Magenta). The MOVE and DRAW commands draw the first line from 0,0 to 100,100 and the next MOVE and PLOT commands draw the filled triangle.
The VIA
The 65C22 Versatile Interface Adapter is a standard peripheral found in many 6502 systems (And there were 2 in the BBC Micro). It has 2 x 8-bit IO ports with handshake lines, 2 timers which can interrupt the 6502, a shift register and various other modes to make communications possible. I’m just using one port here for test it and to use it as debugging (when all else fails, light an LED!) but I have plans for some GPIO facilities using it and possibly some sort of IO backplane with I2C and SPI as well as parallel interfacing.
And that’s about all for now – I’m slowly working through and improving the graphics side and the filing system still has some work to finish it off, although it has been remarkably robust so-far.
Another software update here – this time thoughts about implementing a filing system.
It would be far too easy to get carried away and start looking at modern systems – e.g. Unix/Linux/VMS where there are a plethora of good filing systems – the down-side there is that they need CPU cycles, memory and use more disk space for metadata that I would like, at the same time, the main filing systems in the ’70s was the CP/M one and in the late 70’s, Apple DOS 3.2/3.3. The initial BBC Micro filing system (DFS) in the early 80’s was, in some respects actually worse than CP/M and Apple DOS, although the later ADFS on the Beeb did fare a little better.
FAT
The other contender from the early 80’s is Microsofts FAT. This is now an open standard but the limitations of the filename length (8+3) irritates me and while there are ways to have long filenames, I really wanted something that did it natively.
Dots and Dollars?
As my system is accidentally becoming more BBC Micro-like by the day, then it might make sense to implement something that at least had an interface that suited the BBC Micro software of the time, but I really did not like Acorns idea of $ dot DRIVE dot directory dot filename (Really? Yes, so todays hello.c was c.hello, where c was a directory!) anyway, by the 80’s I’d already been using Unix, so …
Enter Apple ProDOS.
Round about 1983 Apple developed ProDOS as an upgrade from their DOS3.3. On the Apple II it was more than just a filing system – it had hooks into BASIC and some other stuff, however the underlying filing system part was interesting and I had looked at it back in the mid-80’s when I had thoughts to implement it on my BBC Micro at the time. So I dug out my old notes and books – Beneath Apple ProDOS and refreshed the old grey cells with it’s on-disk data format/metadata.
One thing it does reasonably well is to enable file storage relatively efficiently – if your file size is under a block (normally 512 bytes) then it needs no extra on-disk storage blocks, just a single pointer in the files catalog data. I also worked out that it would be relatively easy to change the block size too – right down to 64 bytes which would favour using the 4KB NVRam in the ATmega host processor as a storage device too.
I sketched out some ideas and decided that the on-disk format would be similar to ProDOS although the actual catalog/directory structure would more reflect the BBC Micro requirements and allow me to have up to 20 characters for the filename, although the interface would be more along the Unix open/read/write/close style with a small translation layer to accommodate any existing BBC Micro software I wanted to run. I feel that this might let me run something a little more modern than that old BBC Micro software in the future.
Sizes, shapes, ?
ProDOS uses a 16-bit pointer to address the underlying disk blocks. This gives us a maximum of 65536 blocks per device, or a raw capacity of 32MB when using 512 byte blocks. The file length limitation for ProDOS is 16MB as it uses signed 16-bit value – I removed that limitation – not that it really matters.
By todays standards, 32MB is pitifully small, however this is an 8 bit device with 64KB of RAM, so the reality is that it’s going to be just fine. (And it’ll also be OK if/when I move to a 16-bit 65816 system) I’ve decided to use a standard DOS MBR partition table, giving me up to 4 partitions of 32MB each. I think that’ll do for now.
I could increase the blocks size – going from 512 to 1024 bytes would double the capacity to 64MB, but it would also double the RAM requirements for buffers and so on and in an 8-bit micro with 64KB of RAM, every byte counts.
Media?
Did I want a real floppy drive? Not really. I didn’t want to use one of the many emulators (e.g. GoTek) either. USB is too complex to implement (for now), so I looked at CF cards which essentially have an IDE interface or SD cards which have an SPI interface and settled on SD cards – also because I have many of them and have used them frequently in Raspberry Pi projects over the past 7 years or so.
SD?
One thing I’ve learned from the Raspberry Pi systems is that SD cards are actually quite fragile. The worst thing you can do is power them off during a write. Then there’s the issue of them (potentially) wearing out. For now, I’m going to treat them as disposable items and keep good backups. This is something I advise all Raspberry Pi users to do anyway.
How do you write a filing system?
What bits do you do first? It’s been an interesting journey so-far (and it’s not complete as I write this) I started with the device block drivers – seemed simple enough – although SD cards – not quite as straightforward as they may seem, however I now have basic block read/write working well and the native block-size on an SD card is 512 bytes which fits well with the block size for the filing system. for SD cards I am also using a standard DOS MBR partition table – this gives me 4 partitions of 32MB each – it’s still laughably small compared to the 8GB SD card I’m using, but it will do for now.
I also wrote some code to let me use the 4K of internal NVRam in the ATmega host processor as a drive, and up to 8KB of RAM as a small/fast RAM disk – it was also very handy for quick testing too, although I may lose it later to free up some RAM if I decide to start caching read/writes to the SD if I need a performance boost.
Directories, drives, devices, volumes?
How do you represent a filing system with multiple devices (or SD card partitions)? CP/M and MS DOS typically use a drive letter, e.g. A or C followed by a colon, then the path to the filename. Apple DOS simply uses the drive number, so filename,d1. the Unix way is to mount devices so they look like another sub directory and appear transparent to the user. This is the approach I want, although I’ll do it all at the very top level. I’ll also use forward slashes (/) as the directory separator, so a filename will look like: /sd0/path/to/filename or /ram/filename and so on. The very top-level simply being a virtual directory with the device names, so /nvr for the NV Ram in the ATmega, /ram for the ramdisk, /rom for a ROM file system (out of the internal Flash in the ATmega) and /sd0, /sd1, /sd2 and /sd3 for the 4 partitions on the SD card.
Order…
After testing the block read/write code, the format command/functions seemed naturally the first thing to write, although when developing that, I quickly wrote a block dump command for debugging… The RAM disk was proving to be a boon here too. Format involves creating all the disk allocation bitmap blocks and the first catalog block. I decided I’d create one catalog block to start with, then add more catalog blocks as needed. On a filesystem with 64-byte blocks, there is room for just one file entry per block, but on a 512 byte block-size filesystem, there is room for 12 entries. When a catalog block is full, a new one is allocated and the first one is linked to it – in a linked list fashion. Right now there is no facility to delete empty catalog blocks, (e.g. after lots of file deletion), but I may come back to that later.
Format, then the open (create file) and write functions were next, and my disk dumper was very handy here., and at this point I started working on the Acorn MOS side of it too. The Acorn MOS has a number of calls, the primary one is OSFILE. This deals with whole files at a time and is the most efficient way (from the old BBC Micro point of view) to get data to/from a disk…. However as I’ve written a Unix style filesystem with open, and write calls, a small bit of 6502 code was needed to translate OSFILE into a combination of open, write(s), and close to write a whole file out. The MOS side is all on the 6502 and the actual filing system side of it runs on the ATmega.
It started to be a bit of a grind and my envy and admiration for the people before me who did this for the computers of the 70’s and 80’s was growing….
However, it all started to come together – read was implemented, a better catalog output then realising this is just the tip of the iceberg. Testing on SD card (and the relatively slow NVRam) shows that there are optimisations to be made, caching to be done and so on. There is also a lot of “hole in my bucket” stuff happening – so e.g. opening an existing file for writing might truncate that file to zero length under Unix, and that’s more or less expected under Acorn MOS with OSFILE, so the file truncate code needs to be written (which is really part of the file delete code), and that actually leads into the seek code – which is needed for the OSFIND, OSGBPG MOS calls, etc. then there subdirectories, traversing up and down the directory paths and other questions like sparse files? It’s all possible, but just how much do I want (or need!) to do right now… To answer this, I’m doing it “on-demand”. As I test and play with more and more old BBC Micro software, I wait for it to stall and flag up something else that needs implementing, then implement it. This isn’t ideal, but it makes sure I get everything done that needs it and allows me to incrementally test it as I go along.
At this point, I have a nice little 65C02 system with 64KBytes of RAM, a little “monitor” with serial interface. I can run Applesoft, ehBasic and BBC Basic.
Where now?
Well… without really trying (nor setting out to do this initially), I have more or less created a very much cut-down BBC Micro. I can load (BBC Micro) ROMs from the flash “filing system” on the host processor, I’m working on a “proper” filing system as the host has some spare RAM and NVRAM (only 8K and 4K respectively, but better than nothing!) and I’ve added a SPI access SD card. (More on the filing system later).
My ideal 8-bit system?
Right now (April 2019) prompted by a video by “the 8-bit Guy”, there are a few public projects where people are creating their “ideal” 8-bit micro system (although they’re all using the 65C816, a 16-bit chip) There is Daves one – now called The “Commander X64” and Stefany Allaires “Foenix” – these both have ideas stemmed from the Commodore 64, and Lenore Byrons “Neon816” which is fairly generic but she has indicated it’s inspired by 8-bit Daves ideal computer which is Commodore 64 based.
So, while I never initially thought about this route, I’m now wondering what my ideal 8-bit (or 16-bit) system might actually be..
Here are some thoughts: I think I want something based round mid 1980s technology and style but with a modern approach. 65C02 or 65C81 based and enough RAM to be usable and running at a good but stable speed. By the mid 80’s, my world revolved round the Apple II as a work computer (writing 6502 assembler, mostly) and I had a BBC Micro at home. I was also using the BBC Micro in a work environment writing lots and lots of BCPL. I simply didn’t get into the games side of it at all (The exception being text-based adventures and Elite)
The Apple II, while sturdy was feeling slow, although the ProDOS filing system was keeping it going. The BBC Micro was well established with a good, modern (for the 8-bit world) BASIC with named functions and procedures, local variables, a nod towards a more structured programming approach, and so on. It also had an “operating system” which was very comprehensive from an API point of view, but while it did support a command-line, there wasn’t really a command line “shell” as such. (I was also using Unix and Primos at that point) My thoughts had been to improve on the shell/command-line aspect of it with utilities loaded from “disk” as required. (and ROMs). Possibly a bit like the way CP/M works, although a very (very!) cut-down Unix would be nice…
Thinking about the underlying operating system – I came to the conclusion that the Acorn MOS would be hard to better on era-style hardware. It has a very well defined interface and although a lot is very BBC Micro specific, a lot is also very generic. For example simple character output and cursor positioning – there’s a standard call for that – which makes it very easy for me to translate those calls into standard ANSI terminal cursor movements to make a serial terminal work well, and also to a graphical video system when I build it. (I’ve yet to try some BBC Micro editor ROMs though and while I’d like to think they used the MOS, right now I don’t know!)
Bytes and Words
And so, I’ve slowly been working through the Acorn MOS calls, running a ROM or 2, seeing what they need and filling in the gaps. There are 2 main calls: OSBYTE and OSWORD. OSBYTE deals with small byte-wide data and OSWORD requires a larger parameter block. Typical OSBYTE calls may be to select output destination (e.g. printer), to read buffer status and perform keyscans, OSWORD for larger things like “read in a line of text with simple editing”. I have debug output so that when an un-implmented call happens, I get to know about it and can work out if I need to write a full implementation, or simply return with it unhanded.
Command line
The command line is something I do want to work on. Right now, I have implemented OSCLI which takes a line of text and parses and executes it. So with just a few lines of code, call the relevant OSWORD to read in a line, pass it to OSCLI and you have a very simple command-line interpreter. Ultimately I’d like to do console output redirection, similar to using the < and > functions of a typical Unix shell and this should be possible – I just write the code… And filing system…
It does leave me with a nagging thought that all I’ve done is re-create a poor-man’s BBC Micro though and I’m now thinking how I can modernise this while keeping a familiar feel to it all. One thing would be to move to using the 65C816 processor – this is the 16-bit successor to the 65C02 with a 24-bit segmented address bus (16MB of RAM in 64K banks) – however it wasn’t that well used back in the ’80’s. The Apple IIgs and the SuperNES both used it, but almost nothing else (There is the Acorn communicator, but there weren’t really aimed at the general public, sadly) However the ‘816 is almost 100% compatible with the 65C02 in emulation mode and can switch to 16-bit mode (and back again) very quickly, so it seems like a logical choice, however that’s for the next project. For now, I want the Ruby 6502 to the point where I feel it’s as good as it will get.
After making it on breadboard, I was already relatively confident that it would work on stripboard and my initial testing went well. I could access the shared RAM from the ATmega, write test patterns into it, read them back and the initial bring-up of the 6502 went well. I wrote a tiny program to take the reset vector and loop to itself which let me probe some data and address lines to see that it was all working, and it was, so next step was to make it do something more useful …
Traditionally…
Most old (and old-style!) 8-bit micros had some sort of “monitor” program that ran at boot time.An early example is WozMon. This would let you edit memory, maybe load programs from a punched tape or audio tape and provide a way for programs to print and take keyboard input. The Apple 1 worked like this.
Often it was hidden away and all it really was was a set of basic input/output subroutines (what we might now call a BIOS) which were used by the main BASIC ROM to communicate with the outside world.
The Apple II, PET (and Vic20/C64), TRS-80, ZX Spectrum, and many others all worked in a similar manner to this
The Apple II did have another trick up its sleeve… It had a full-blown “monitor” that could let you display and alter and move memory, disassemble 6502 instructions, a mini one-line at a time assembler as well as a few more features like some floating point subroutines and a pseudo 16-bit interpreter.
The BBC Micro was slightly different again – come 1981 and some ideas had changed, so it had what we might now recognise as an operating system with well-defined ways to call functions inside the OS to perform text input and output, graphics, sound, disk (and network) filing systems and so on. There was a command-line interface to this Machine OS (MOS), but for the most part, you’d turn the computer on, and half a second later, like most of the other micros of the day, a beep then you were in BASIC. The command-line interface was commonly accessed from BASIC (and other languages) by typing a star (*) then the command, so the phrase “star command” was popular.
The main alternative to this style of computer startup was CP/M. More popular on 8080 and Z80 systems. This loaded from disk and provided a set of basic input and output subroutines (ie. BIOS) and a command-line driven interface. Almost all commands were then loaded from disk into RAM to be executed. Many modern day systems work like this.
What do I do for Ruby?
After initial bring-up testing and writing some basic routines to talk back to the ATmega host processor via the shared memory interface, I started with an Apple II style of monitor. I wrote a somewhat simplified version which let me do things like dump and modify memory, memory tests, poke short bits of code and execute them. I made this with a well-defined interface for character IO and a few utility routines, so that other programs could use it for keyboard and screen input and output and so on.
This worked (and still works!) well. I can use it to run ehBasic and Applesoft BASIC and I’ve also had Apple Integer BASIC running under it too, as well as a few of my own programs. I also wrote a new implementation of Woz’s Sweet16 for it too – to make it go a little faster and remove a (re)location issue it has. (I have plans for a project that will need some 16-bit data manipulation so I thought this might be handy)
And that works well. I ran a few versions of this under Applesoft and ehBasic and use it as a sort of system soak test.
IO IO, it’s off to work I go …
The final thing to test was my single bit of IO decoding. I wrote a program, connected an oscilloscope to it and the scope trace wiggled as I expected it to. (Actually, not first time, I went through an iteration or 2 of my GAL programming to get it right). I hooked the signal up to an 8-bit latch with the inputs connected to the 8-bit address bus, then I could light up some LEDs.
This video is incrementing a counter each time it finishes a simple memory test:
Blinkenlights are always a good thing and a traditional Larson Scanner was written. (In Sweet 16)
Here is the code:
        jsr     strout
        .byte   "Larson 16",13,10,0

        goSweet16

        set     r12,$0100       ; Sweet16 stack pointer
        set     r2,$00FF        ; Larson data end marker value
        set     r8,IO_REGISTER  ; Update LEDs

loop0:
        set     r1,larsonData   ; Address of the data table
loop1:
        ld      r8              ; Copy r8 - address of LEDs into r7 because ...
        st      r7

        ld      @r1             ; Loads and increments r1
        cpr     r2
        bz      loop0           ; Reached the end
        st      @r7             ; ... store increments

        bs      delay
        br      loop1

delay:
        set     r3,$0800
sub1a:
        dcr     r3
        bnz     sub1a
        rs
        .setcpu "65c02"
After the Apple II, I would consider the BBC Micro to be my next favourite 8-bit micro system. Although they really tie for top place for many reasons. It was easy to say (back in the day) that the Beeb was better, faster, etc. but it also had 3 or 4 years advantage – and back then, 3 years was a long time and technology was changing really fast!
Anyway, after another “how hard can it be” moment I started to look at getting BBC Basic running. Fortunately a lot of hard work has already been done by others on this and Jonathan Harston in particular (See: http://mdfs.net/) so it was relatively easy. I had to write just 3 Acorn MOS “OSBYTE” calls to make a text-only BBC BASIC run.
Well, not quite – there was slightly more to it than that – mostly to do with IRQ/BRK handling, however I can now run BBC BASIC on Ruby and I’ll write about that soon..
Although before I close this one, just a note to say that once it was on stripboard and I’d written the code to do some memory tests and BASICs I decided to see how fast I could get it to run at… the W65C02 is rated to 14Mhz and I had been hoping I might get it up to 8Mhz – I did use some good fast memory but otherwise I didn’t really put much effort into the stipboard layout, and so once it was happy at 1Mhz, I tried 2Mhz, then 4 and 8Mhz crystals. At 8Mhz it was just as stable as 1Mhz and as I didn’t have any more crystals, I decided for a bit of fun to go for broke and tried the 16Mhz crystal I was using for the ATmega and just run a wire over the board. (See the green wire with a knot in it in the video above) I was quite amazed that it worked. And it continues to work just fine at 16Mhz although to save wires flying all over the board, I’m currently running it at 8Mhz.

 These are the sourdoughs after 4 to 5 hours. They’re nice and bubbly and ready to use.
 This is the spiral mixer. It’s single speed with a fixed head, so getting the dough out requires a certain knack, as does cleaning it. Spiral mixers are very common – this is an Italian make and you’ll find these used in pizza parlours the world over.
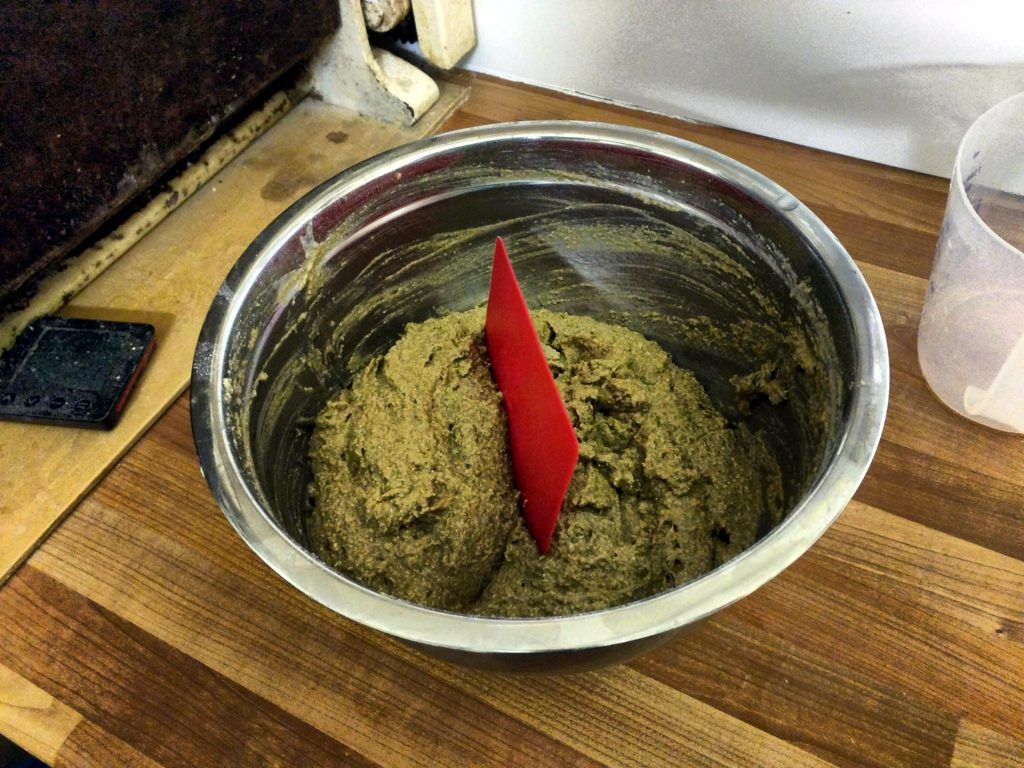 The rye is mixed by hand – only a few loaves usually and it’s a very wet and sticky dough. Gluten doesn’t develop in rye the same way as wheat, so there’s no point trying to knead it really. Keep it wet with a sourdough starter and it’ll be just fine. I add caraway seeds, malt and molasses to mine.
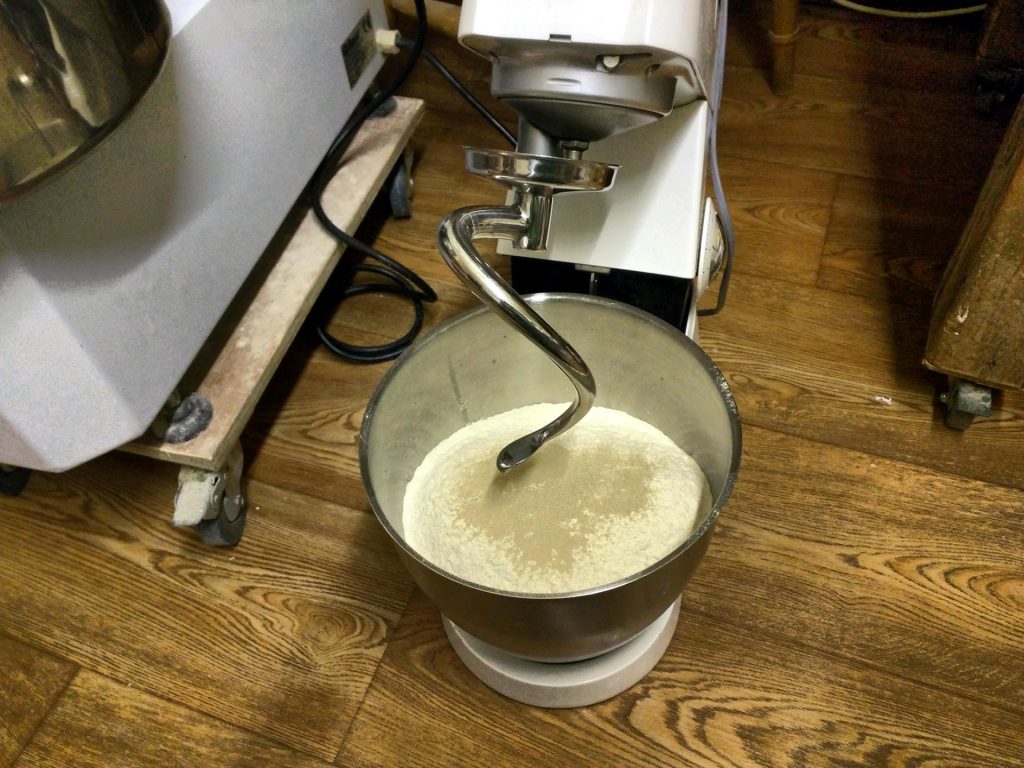 The overnight white dough that I use for the cheese breads is an olive oil based dough with just a fraction of the normal yeast added (it’s not a sourdough). This is mixed in a small stand mixer that I was able to get a nice dough spiral hook for. These are much better than the usual hook you get with them.
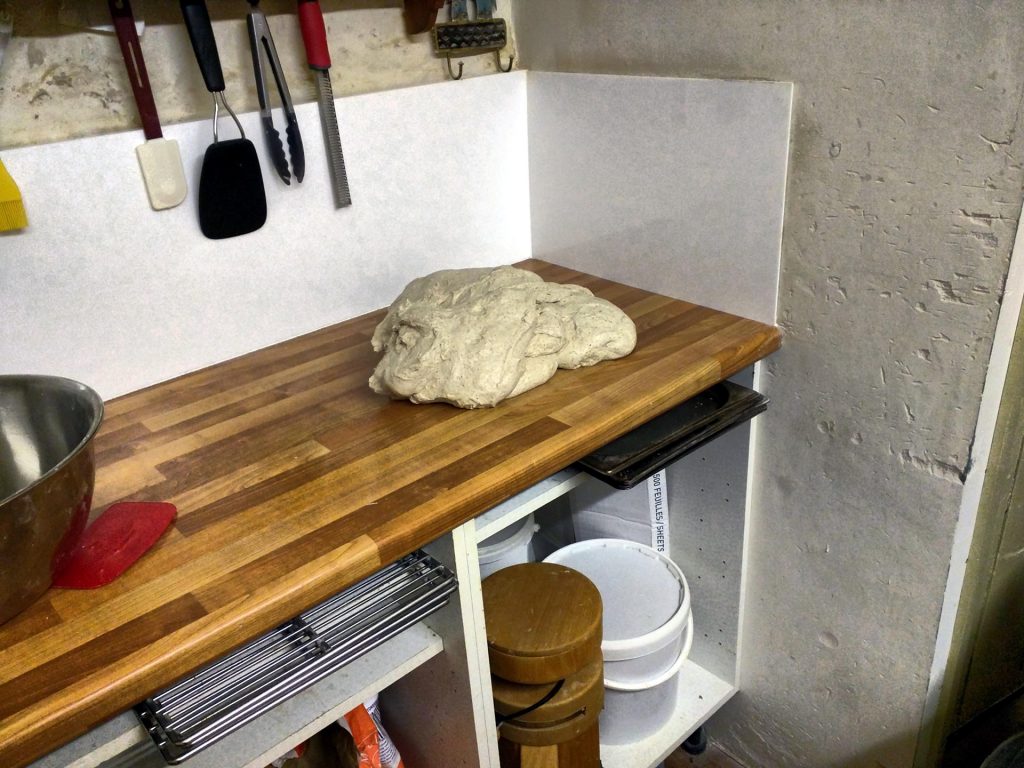 This is a lump of dough taken out of the spiral mixer and left to rest on the bench while I load it up with the next batch. I try to keep the mixer going all the time so I make sure I have everything ready to load it with as soon as I take one batch out. I also try to plan the loads to avoid too much of one type of dough getting into the next batch, so the seedy ones are often last with the plain white (when I do them) first. This day I had 3 lots through the spiral mixer – my usual sourdough which is a mix of white, wholemeal and rye, then a seeded mix, then the 100% wholemeal. I’m not overly concerned if a few seeds get into the wholemeal – I stopped using the main allergen one a long time ago (sesame seeds)
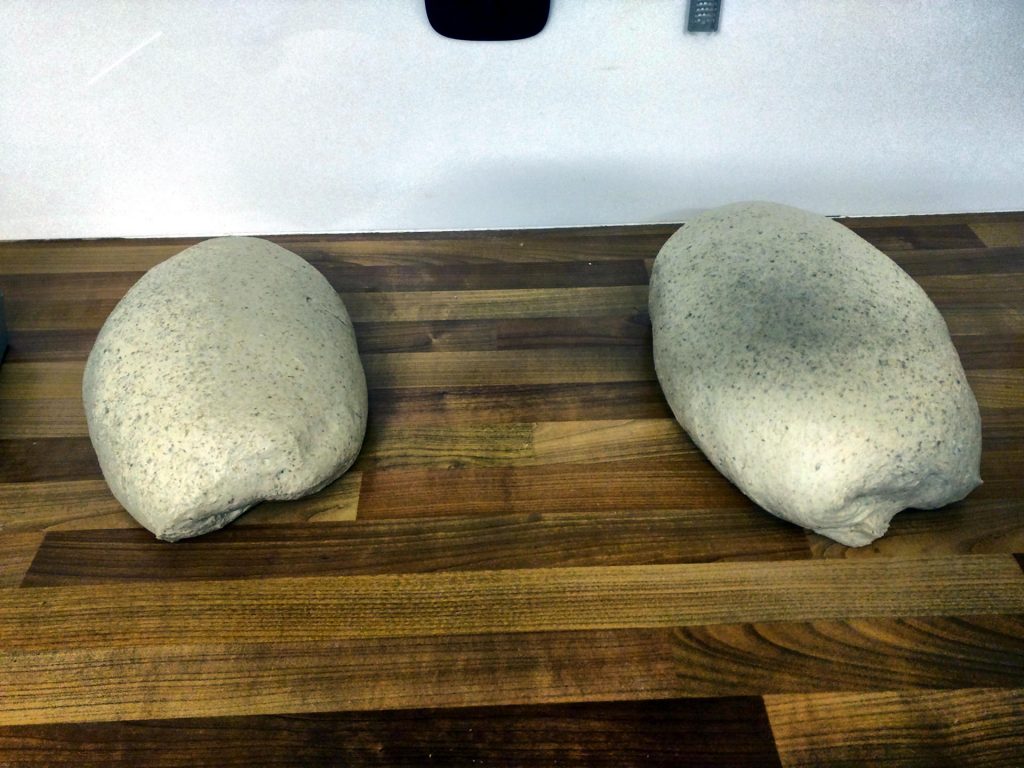 This is a load from the mixer that I’ve weighed and divided into two – the smaller on the left will make exactly 5 loaves and the larger on the right will make 7. My largest tub will only take dough for 10 loaves, so the split is needed.
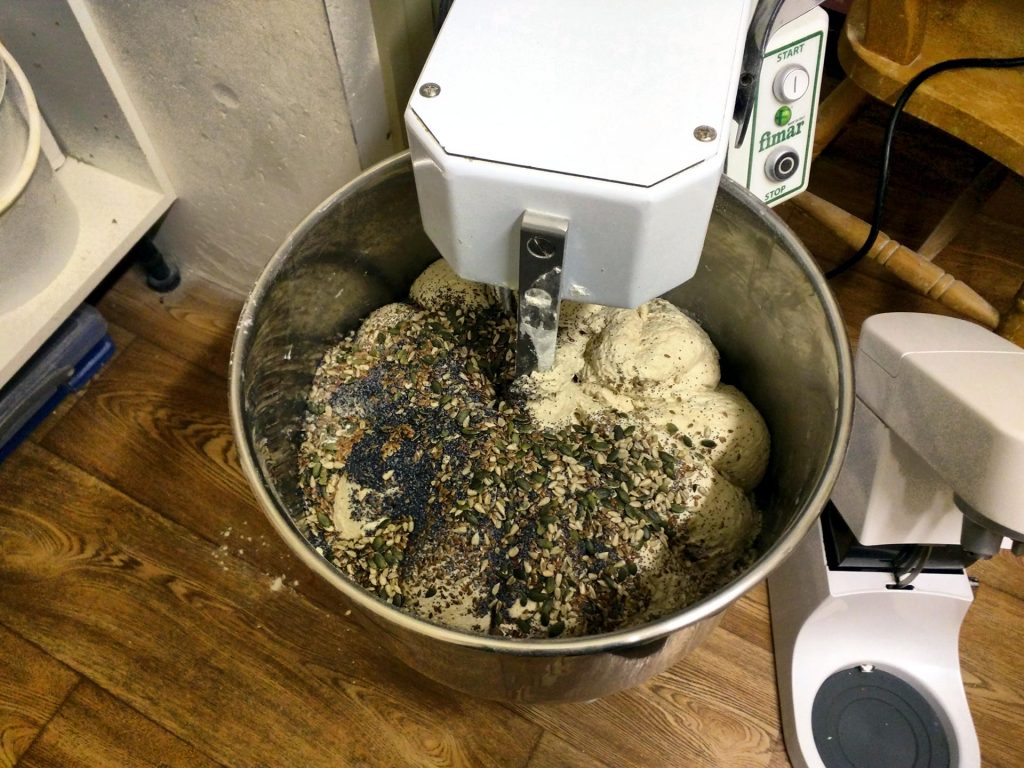 Here is some multiseed in the mixer. I get the dough formed first, then add in the seed mix – I make it up myself and is a mix of poppy, linseed (brown and golden), pumpkin and sunflower seeds. I used to buy a commercial mix that included sesame but even though my labels were clear on what was in them, I decided to drop sesame a while back due to some very public issues involving a fatality due to a mis-labeled product. (Pret a Manger)
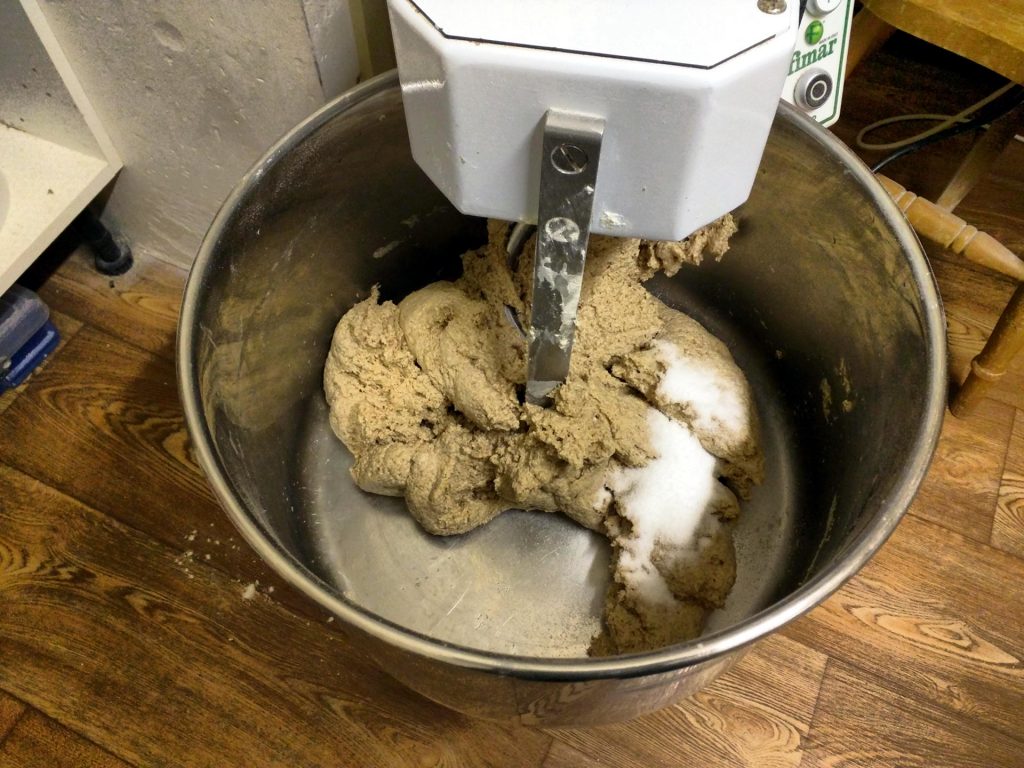 Last through the mixer is the wholemeal. Here it’s had the initial mix and I’ve just thrown the salt into it. (It’s a bit of a wet mix, but not as wet as the rye!)
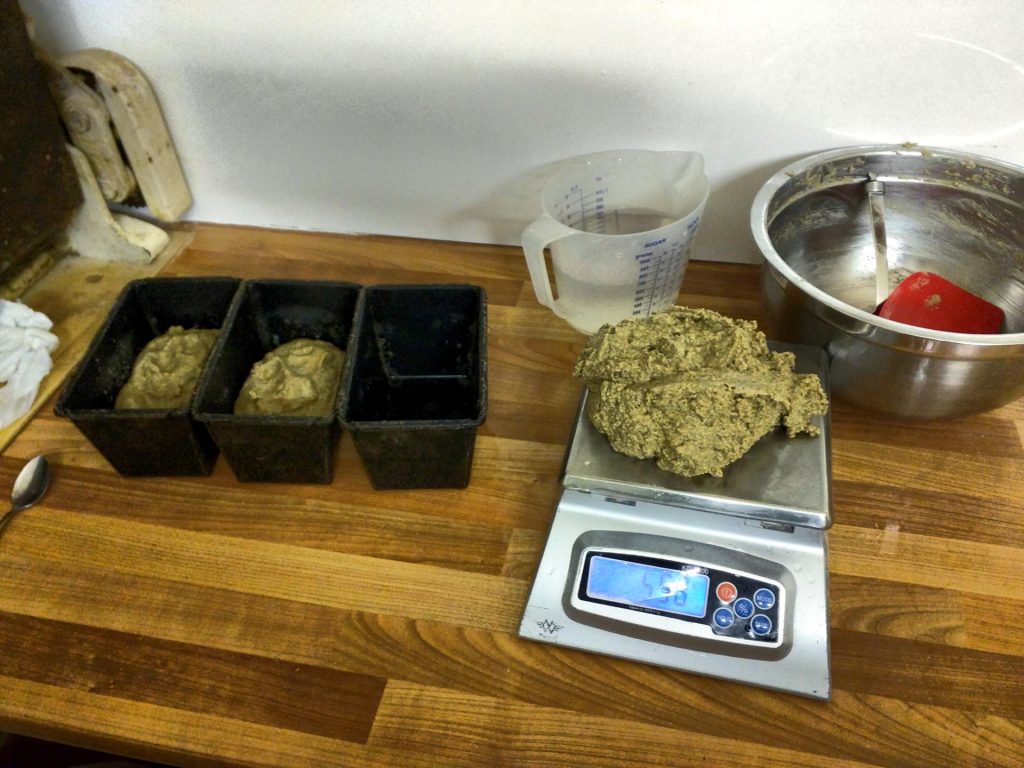 While all the machine mixing is going in, I find a few moments to scale out the rye into tins. These stay in the fridge overnight and rise slowly there and are first in the oven in the morning.
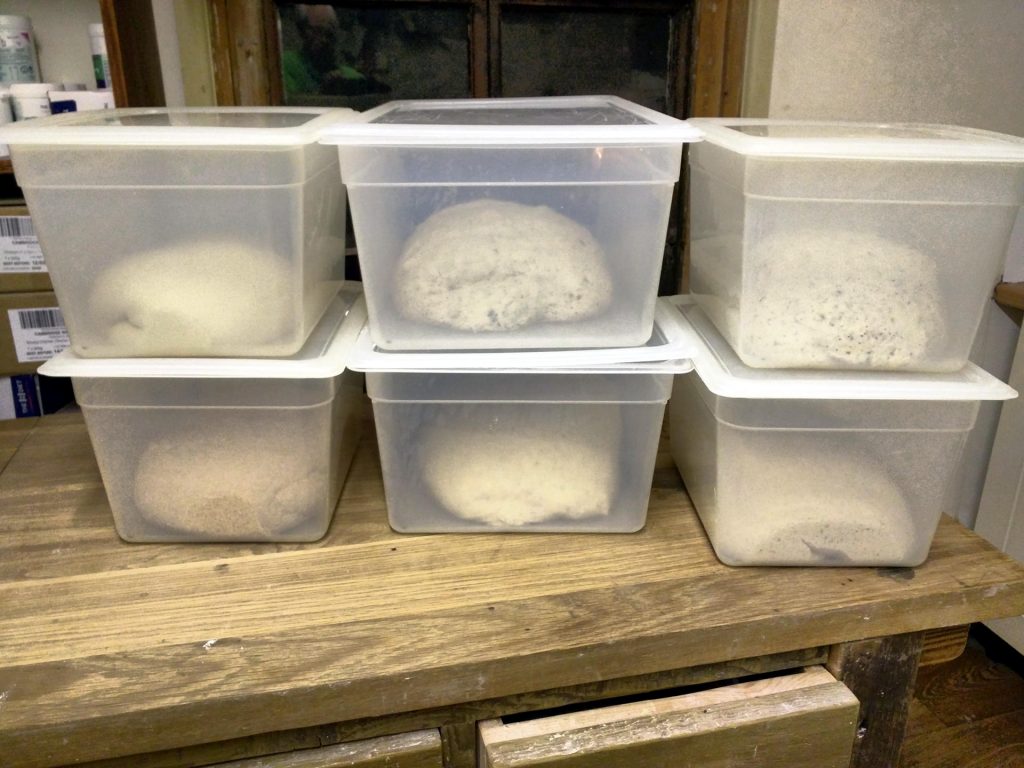 The dough is moved into the tubs as it’s mixed and kneaded and gets left there overnight. Now it’s clean and tidy the place up, have some supper and off to bed!
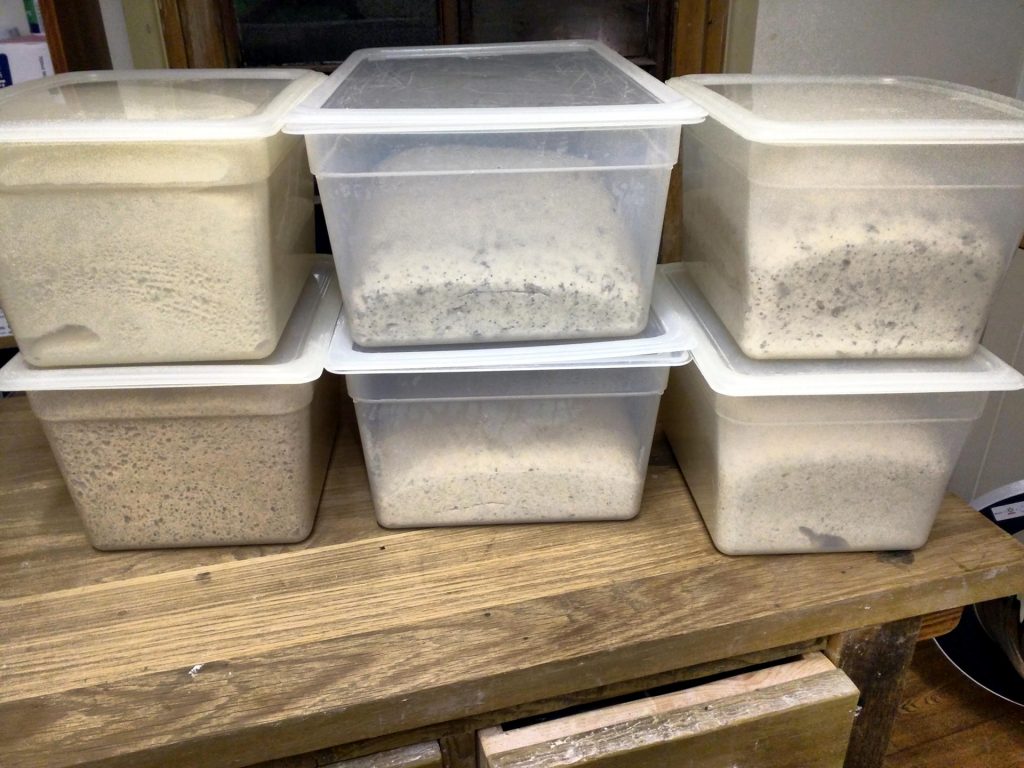 This picture really belongs in the next post as it’s tomorrow morning, but I’ve put it here to compare with the one above. You can see how much it’s all risen. The left 2 tubs are the white olive oil dough and the wholemeal dough – these are both made with dried yeast, although only a fraction of what you’d typically use for a standard 1-2 hour process.