The Raspberry Ladder Board

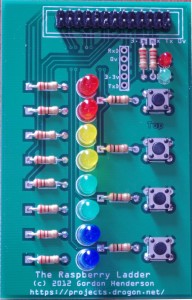
The Raspberry Ladder is a small kit comprising PCB with LEDs, resistors and switches intended to be used to experiment with the Raspberry Pi’s GPIO functions and hopefully to get people interested in soldering up their own projects. Soldering is not difficult and it’s a good skill to learn if you are keen to learn more about electronics. (or repairing jewelry!)

The Raspberry Ladder Board

The Raspberry Ladder Board

The kit is quite easy to assemble and to help you put it together, I’ve made a video demonstrating a board being soldered and tested.

The Raspberry Ladder was featured in the November issue if the MagPi Magazine – please read the original article if you can – it has details of the assembly process as well as a picture or 2.

Click here for the assembly video via YouTube.

Please Buy the kit from Tandy in the UK

So what can we do with 10 LEDs and 4 switches? quite a lot, I hope. This blog entry is just a taster page for it all – software supplied which you can download includes a simple test program (to make sure it’s working OK!), a version of the ladder program which was the inspiration for this board, the Tuxx Crossing simulator, and some new programs – A version of the “Simon” game, and a reaction tester. These programs are written using Bash Scripting, C and BASIC – and I’ll welcome some contributions written in Python, Scratch, or anything else you may care to use!

For more details of the software to drive the board, please see this page.

Halloween Pi

If you’re a reader of the MagPi magazine then you may have seen my Halloween Pi project in the October issue…

If not, then have a quick wander over to their site: http://www.themagpi.com/ and have a look!

Octobers magazine featured a little Halloween project I did – sadly, due to a few factors beyond my control – some family illness necessitating a round trip of some 5000 miles to Tenerife and back, and the seasonal availability (or rather lack or it!) meaning I was little pushed for time and unable to get a real pumpkin before the publication date, I felt I didn’t give it all it was worth, so I’m  re-doing it here for my own archival use and to maybe add a few more things into it.

The idea was to put some flashing LEDs inside a pumpkin along with a PIR sensor  so that when triggered by movement, the LEDs would flash some colourful patterns.

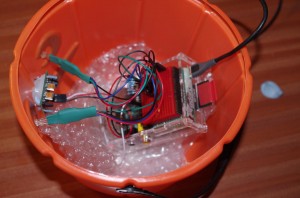
Because I couldn’t get a real one on-time, my pumpkin was built in a plastic bucket… Not that bad really, but could have been better – it was in the shape of a Halloween pumpkin though!

Photos

The Halloween Pi

The Halloween Pi

Inside the "pumpkin"

Inside the “pumpkin”

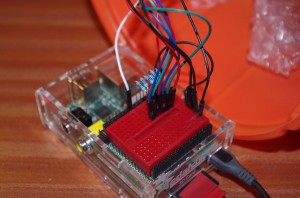
The brainbox of it all

The brainbox of it all

Rather than solder, I used some heat-shrink to hold the wires of the LED to the female to male patch leads. The little board on-top of the Pi is the Dtronixs Minipiio board and it’s all sitting inside an Adafruit case.

The rest of the hardware if fairly straightforward – They are common cathode RGB LEDs and the PIR sensor.

Ingredients

The Dtronixs board isn’t available – yet, but I understand “real soon now”…

If you’re outside the UK/Europe, then I strongly suggest looking at the Adafruit site for these bits & pieces, and more, but most hobby electronics shops should have everything you need.

Note that the resistors are a little lower than I’d normally use – these RGB LEDs are quite bright and need a slightly higher drive requirement than the common red/green/yellow ones to be effective. (and even here, those are the typical values for a 5v supply – the LED will be slightly dimmer powered from the Pi’s 3.3v, but you really won’t notice it)

Wiring it up

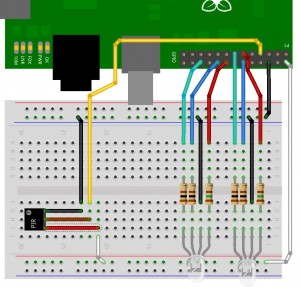
No surprises here – GPIO’s 0, 1 and 2 (wiringPi numbering convention) to the Red, Green and Blue of the first LED, 3, 4 and 5 to the RGB of the 2nd LED, and pin 7 to the input from the PIR sensor. A Fritzing diagram is below:

Breadboard layout

The first LED is on the right in this diagram. (Not that it really matters!)

Software

I wanted to use the software PWM library in wiringPi to light the LEDs up and make some interesting colours/patterns, so that meant the software needed to be written in C (at least initially)

If you don’t already have the  wiringPi library and gpio utility installed, then:

cd
git clone git://git.drogon.net/wiringPi
cd wiringPi
./build

and that will get the code and install it for you.

Get the Halloween software by a similar method:

cd
git clone git://git.drogon.net/halloweenPi
cd halloween
make

Before running the software, you can test the LEDs and sensor with the following commands:

for led in 0 1 2 3 4 5; do gpio mode $led out ; done
gpio mode 7 in
gpio write 0 1   # 1st Red LED ought to be on
gpio write 0 0 ; gpio write 1 1 # Red off, Green on
gpio write 1 0 ; gpio write 2 1 # Green off, Blue on

You can do the same for the 2nd LED using numbers 3, 4 and 5 respectively.

If you’ve wired the colours up wrongly, then it’s easy to change them and use the gpio command to check.

The PIR sensor works by firstly sampling the surrounding heat “signature” for a few seconds, then waiting for it to change. So to test it, you need to be very still… and keep on typing the following command: (Use the up-arrow key!)

gpio read 7

It should read 0 when not triggered and read 1 when it is triggered.

At this point, assuming all is OK, you can run the program:

sudo ./halloween

and see what happens. Remember that it needs 5 seconds of stillness to register, then you can move and see what happens.

If you want to change the patterns then you need to look at the ledPatterns.c file. You can use that as a template, or modify the code already there – whatever you do, have fun!

Extras

If you are carving a real pumpkin, then here is a suggestion or 2 – get a black marker pen and draw a zig-zag round the top, also decide where the back is and draw a short vertical line through the zig-zag – that way, you’ll know exactly where the top goes when you come to putting it back on again!

Scoop out the flesh, but don’t throw it away! You can use it to make some tasty roast pumpkin soup as follows:

Put the flesh into an ovenproof dish with a glug of olive oil and a sprinkling of salt and roast in a hot oven – 220C or Gas mark 7 for about half an hour or until it starts to take a little colour.

Remove from the oven and transfer into a pan. Add in half a vegetable stock cube (or a whole one if you carved a huge pumpkin!)  and a small tub of single cream. (again, maybe a a large pot if it’s a huge pumpkin!)

Mash or blitz with one of those hand-held mixer thing and return to the heat to thoroughly warm through – add a little milk or water if it’s a bit thick, and serve immediately with some fresh crusty bread.

For a little variation and more texture, add in a drained tin of sweetcorn and to make it a little warmer, try some smoked paprika sprinkled on-top when serving.

Some Halloween information

Halloween is an old festival or celebration, or ritual which has been adopted by many cultures and religions over the world. It’s roots may originate in acknowledging the autumn is ending and we should take stock for winter, or to remember the passing of souls, or a time to hide from ghouls or the souls of enemies (hence the masks and lanterns!)  For us, it’ll be a bit of fun, some hot soup and a fancy Raspberry Pi powered lantern!

In Scotland (Where I’m from), you should traditionally use a large yellow neep and make a “tumshie heed”. Some English counties may traditionally use a mangelwurzel and if you can get of suitable size that may be appropriate.

The modern trandition of “trick or treat” may originate from an early Christian practice of baking small round cakes for All Saints Day (November 1st)

PiFace – Mk2

Since I first wrote about the PiFace back in July there has been a new development! Dr. Andrew Robinson who’s the leader behind the project at Manchester university have had some valuable feedback from their initial prototype release and re-designed the board and it’s now a full production product complete with all the regulatory markings, using surface mount technology with many improvements too!

The biggest change (for me!) is jumpers to enable (or disable) the two on-board relays. Now you can have full control of all 8 outputs without having the relays click when you are using the outputs for purposes other than the relays.

There is a nice terminal block with the Pi’s 5 volt supply exposed on a screw terminal to use for your external projects too. Still the same 4 buttons which shadow 4 of the 8 inputs.

Another nicety is the addition of a rubber bumper which sits on-top of the Pi’s HDMI socket and prevents the board moving with the possibility of shorting anything out.

Finally, rather than the 4 little 3mm LEDs on the original one, there is now a bank of 8 surface mount LEDs on the 8 outputs! So you can see exactly which output is on or off.

Software wise, it’s the same as before – SPI interface to the Pi and my existing wiringPiFace test program worked out of the box without any changes.

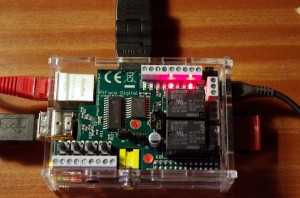
The new PiFace board – note the 2 LEDs lit up – outputs 0 and 3 are on:

PiFace - Mk2

PiFace – Mk2

(Ok, So I can’t actually access the terminals in the Adafruit case, but it was easier for this quick test to leave the Pi in that case!)

So all in all, it’s a fantastic update to the original, and if you want more information on it, then go to their website here.

Minor update – 23rd October

Andrew informs me that it’s going to be a couple of weeks before they’re ready with the full documentation for the board, so hang in there, but keep checking their site for updates!

Experiments in PCB design for the Raspberry Pi

I recently thought it might be a good idea to make up a PCB of one of my Pi projects – the ladder game.

So famous last words: How hard can it be?

Fortunately, it’s not that hard now, and there is a plethora of software available to help you do the design and layout – I’d already started with the Fritzing package to produce the breadboard layouts, so I decided to stick with that. Fritzing also offer a PCB prototyping service too, which is on the expensive side, but they all are when you’re just wanting a small number of PCBs (want 1000? Sure, then the price can drop to under £2, but want one or 2 then expect to pay well over £50 for them!)

However, while using the Fritzing software (under Linux of-course), I decided to not use Fritzing for the PCB manufacture in the end – a few issues, one as that I won’t use PayPal, another was that my bank (NatWest) were just being obtuse and seemingly doing everything they could to block a money transfer to Germany (as well as charging me a stupid amount of money to do the actual transfer!) So in the end, wanting to do this quickly before I went on holiday, after a very quick search, I found PCB Panel who are based in Dorset – not the cheapest, but they base their manufacturing on making an entire panel of the same design – so I ended up with 3 PCBs from their smallest panel.

Fortunately there is a standard for conveying PCB layout data called Gerber Format and the Fritzing software can create a “Gerber” which is really a collection of various files which I could ZIP up and sent to PCB Panel for manufacture.

So cost aside, lets quietly ignore that for now… Turning a breadboard layout into a PCB design was rather interesting. For one, I found the routing of the wires to be somewhat challenging – until I remembered that I was making a double sided board and that it didn’t really matter which GPIO pins I actually used to drive the LEDs – I can fix that up in software later! So the final board has the 12 LEDs wired up in what may initially appear to be a random pattern, but in practice it works well.

And here it is:

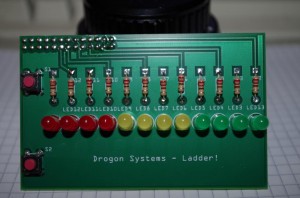
Assembled ladder PCB

Assembled ladder PCB

You may notice a 2nd button on the board compared to the original on a breadboard – no real reason there other than “because I can”.

So what went wrong… You can probably tell from the photo that the silk-screen is somewhat incorrect. I actually did correct it, but in my rush to get things going before I went on a holiday, I emailed the wrong version to the PCB company.

The other thing is the holes for the edge connector – they’re too small. My fault for not checking the Raspberry Pi template I was using, however I’ve reported this back to the person and it turns out he had the same issues too, but it’s now been corrected.

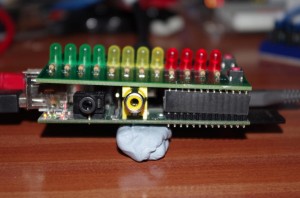
The other issue that’s not apparent is that you need an extra-long 2×13 way edge connector to make it mate with a Raspberry Pi! Standard ones are too short – which is why the PiFace is the shape it is, as it sits underneath the Pi’s Ethernet, USB and composite video connectors.

Ladder PCB Connected to a Pi

Ladder PCB Connected to a Pi

See the image above for details of the connector – and note the need for an extra long one! (If anyone knows of a UK source, please let me know!)

So there you have it. Designed and had a PCB manufactured and it’s the first time in over 25 years I’ve done that and although there are lessons to be learned, I’m actually very happy with the results.

And so tomorrow I’ll design a PCB for the next Raspberry Pi 😉

WiringPi and the Raspberry Pi Revision 2

So the big news is that there is going to be (or already is!) a 2nd revision of the Raspberry Pi PCB, and even bigger is that it’s going to be manufactured (well, assembled) in the UK.

That’s great, but what else? Some of the GPIO pins have changed and that’s not so good for some…

In essence:

  • The I2C pins which used to be GPIO 0 and 1 are now GPIO 2 and 3.
  • The pin that was GPIO 21 on the edge connector is now GPIO 27.
  • There are 4 more GPIO pins available – if you solder on a new connector!

If you are using wiringPi’s native pin numbers then you don’t have to worry. Just get the latest version off the GIT site, install it and re-link your programs.

If you are using the native GPIO pin numbers, then you will need to change your programs – swap GPIOs 0 and 1 for 2 and 3, and 21 for 27.

The 4 new GPIO pins have numbers in the wiringPi scheme of 17, 18, 19 and 20. They are BCM_GPIO pin numbers 28, 29, 30 and 31.

And that’s more or less that!

Understanding SPI on the Raspberry Pi

I’ve been asked to include SPI (and I2C – more on that soon) support for the Raspberry Pi in my wiringPi… However because it’s hard to anticipate exactly what SPI devices you may connect up, it’s hard to provide something specific, so what I’ve done is provide some “helper” functions in a library and a guide on how to use SPI and what it’s all about…

SPI – Serial Peripheral Interface

SPI is an interface developed (or named?) by Motorola which is a Synchronous serial clocked, full-duplex master/slave bus….

That’s a mouthful. In essence, data is sent out synchronised (or locked) to a clock signal which is also sent out (so 2 wires), there is a separate wire for incoming data (3 wires, so data can be sent and received at the same time, so full-duplex) and a fourth wire to act as a “chip select” signal. Because of this, it’s sometimes called a 4-wire bus. The master/slave part indicates that any device on the bus can start a transmission to any other device on the bus. There can be multiple chip-select wires to talk to multiple devices on the same SPI bus.

The Raspberry Pi only implements master mode at this time and has 2 chip-select pins, so can control 2 SPI devices. (Although some devices have their own sub-addressing scheme so you can put more of them on the same bus)

One thing to remember about SPI is that to receive a byte, you need to send a byte. This may sound a little odd, but consider a device which accepts a command byte, then a data byte, then sends back a result byte… To make this happen, we need to send three bytes to the device, which will send back 2 dummy bytes, followed by the 3rd byte with data in it. For example, a GPIO expander chip (e.g. the MCP23S17 as used in the PiFace) where you send it a command (read register), then the data (the register number), then it sends back a return value (the register contents). So, when you send the command, it will send back a byte which you ignore, you send it the data, it sends back a byte which you also ignore, but to make it send the result, you need to send it a third byte which it will ignore!

Another example is the MCP3002 2-channel, 10-bit analog to digital converter chip as used the the Gertboard – that chip actually uses the SPI clock signal to drive its internal logic. The command sequence you send to it is only 4 bits long, but you get 10 bits of data back from it, starting one bit after the last command-bit… so you need to send it 2 bytes and read 2 bytes back from it, and in the 2 bytes back, the data starts at the 5th bit and extends for 10 bits, so to keep the clock going, you need to send 2 bytes, read 2 bytes then pick the 10 data bits out of the returning 16 bits…

So it’s not always obvious!

Installing the kernel driver

The Linux kernel in recent Raspberry Pi releases supports the SPI as a native device (no more bit-banging!) but it’s disabled by default, so we need to load the module before we can use the SPI device. Additionally we may need to change the permissions and/or ownerships of the files in /dev/ so that we can access them from out programs without needing to be root or run them with sudo.

The easiest way to do this is with the gpio program that’s part of wiringPi:

(Instructions to get and install wiringPi are here)

gpio load spi

That command will load the SPI driver and change ownership to the user running the command. Once we’ve done that, we can then run our SPI programs.

If you want to do it the hard/traditional way, then:

sudo modprobe spi_bcm2708
sudo chown `id -u`.`id -g` /dev/spidev0.*

Use the lsmod command to make sure the modules are loaded.

Using SPI

WiringPi provides a small library to help hide most of the issues dealing with opening and sending bytes to/from SPI devices, however if you need something that’s outside what this library can do, then you’ll need to write your own – however the library code is easy to follow, so you should be able to use that as a basis for your own code.

These are documented elsewhere, but in-essence:

if (wiringPiSPISetup (channel, 1000000) < 0)
  fprintf (stderr, "SPI Setup failed: %s\n", strerror (errno))

will get you going (channel is 0 or 1, the 1000000 is the speed – 1MHz here) and:

wiringPiSPIDataRW (buffer, size) ;

will then perform a concurrent transmit and receive of the contents of the buffer (unsigned chars) of the given size. Note that the buffer will be overwritten.

Do have a look at the gertboard.c library for examples of this code – in particular the analog read function, where it sends a command to the SPI A/D converter and reads back the data in the same transaction – then picks the data out of the return bytes.

Abusing SPI

Abusing is perhaps a harsh word here, but it’s possible to use the SPI bus for things that weren’t designed for SPI – one example is shift registers. Just use the clock and MOSI outputs, and write a byte at a time to the SPI device. Another use is the daisy-chained LED strings that are now available at a reasonable price – you can send up to 4096 bytes at a time which might represent a string of over 1000 LEDs, each accepting a 3-byte value, then pause (typically 500μS) to make the devices display the pattern.

SPI Speed?

An important aspect of SPI is that the clock can (usually) be driven at varying speeds – the dependence is usually on the peripheral device being driven. E.g. the analog to digital converter on the Gertboard must be driven at a speed between 1MHz and 3MHz – however the upper limit is the voltage it’s supplied with (3MHz max. at 5v), so it’s important to know in-advance what limitations of the devices you are talking to.

To experiment with timings, I wrote a little test program to see the effects of the different speeds – starting at 0.5Mb/sec going up to 62Mb/sec. I simply looped the MOSI and MISO pins together and checked that the data received was the same as the data sent.

The first thing I found was that the Pi stops sending at clock speeds over 62Mb/sec., and that in-reality 32Mbs is the upper limit of the SPI clock.

Next, I noticed that for some clock speeds, the data rate doesn’t change – this is due to the rounding issues when calculating the clock divider value. What I have observed is that the speeds available are:

  1. 0.5 MHz
  2. 1 MHz
  3. 2 MHz
  4. 4 MHz
  5. 8 MHz
  6. 16 MHz and
  7. 32 MHz.

You can see the progression, it’s powers of 2, and this reflects the clock divider values too.

The important thing to realise is that if you are clocking a part designed for a SPI clock rate of 25MHz, then setting the clock to 25MHz will really create a clock of 16MHz. There is no way to get an exact 25MHz clock speed. This probably isn’t important, and the reality of trying to send a 25MHz signal down a pair of wires or along a PCB track is that it’s highly likely to not work unless you take good care with the signal routing, shielding and so on.

Another observation was that the overheads in the Linux kernel increase with clock speed and the data throughput doesn’t quite increase linearly with clock speed. So with a clock at 1MHz we get a throughput of 0.108 MB/sec, at 2MHz it’s 0.214 MB/sec and it more or less doubles up to 16MHz (1.55MB/sec) but at 32Mb/sec clock, it’s barely 2.2MB/sec when you might expect it to be closer to 3MB/sec.

Finally, it’s worth while noting that the actual latency of calling the wiringPiSPIDataRW() function is rather high – an example I tested was sending 2 bytes at a time to the Gertboards digital to analog converter and rather than the 50,000 updates/sec I was expecting I was seeing barely half that, and a few experiments shows that it wasn’t that tied to the SPI clock frequency either.

Summary:

SPI is easy to use and can be fast. Be aware that communication is full duplex and data comes back at the same time as you send it, so be prepared to pick bits out of the return data – often at funny bit offsets, rather than byte offsets. The Pi can only directly drive 2 SPI channels, but some devices have their own sub-addressing scheme to allow for more on the same bus.

Software PWM on the Raspberry Pi

Frustrated by the fact there there is only one easily accessible PWM output on your Raspberry Pi? Then this article is for you, because now you can use ANY GPIO pin as a PWM output thanks to the latest addition to wiringPi

The latest addition is a software driven PWM generator that runs as a thread in the background of your program managing the outputs of the pins in a PWM manner. It can be used to control any number of pins on your Pi – from 1 to all 17 if desired.

The down-side? Well, like my 7-Segment LED driver, it’s not perfect. Even though it runs at a high priority using a real-time scheduler inside Linux, it’s still prone to being temporarily descheduled for a fraction of a second, however for  driving LEDs and motors, it should be fine. The other overhead since it’s software driven is CPU cycles – and in the default configuration with a base PWM frequency of 100Hz, then the overhead is about 0.5% per pin. It’s not really practical to increase the base frequency without CPU usage going through the roof, or the resolution (range) going through the floor. The minimum pulse-width is 100μS due to Linux timing issues – combine that with a range of “100” and you get a frequency of 100Hz. (See the code for more details).

Oscilloscope output of 3 PWMs

Oscilloscope output of 3 PWMs

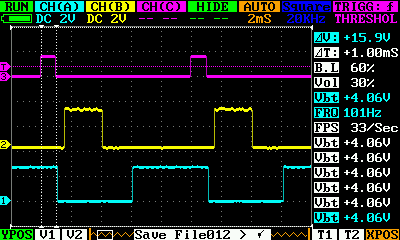
The ‘scope trace above shows… The Purple trace is the one it’s triggering one and that represents an output value of 10 – the vertical markers and the ΔT measurement shows 1mS which is right – 10 x 100μS pulses. If you count the dotted squares, there are 5 between the leading edges of the rising edge in the Purple trace which at 2mS per division is 10mS giving a PWM frequency of 100Hz.

The Yellow trace is an output value of 25 and the Cyan trace has an output value of 50.

Each PWM signal is generated by a separate thread so they all run independantly of each other. The traces are surprisingly steady though.

Finally, one of my infamous videos:

NES Controller on the Raspberry Pi

Part 1: The Hardware & Driver

Some time back, I joked that the Raspberry Pi’s GPIO port really stood for Game Port IO… So to make that joke come true, I present a way of interfacing the NES Joysticks to the Raspberry Pi.

First you need the joystick/controller unit, and a quick trip to the Plymouth Market where I’d had a tip that there was a stall selling retro gaming gear and I returned with a pair of them for under a tenner. Bargain!

NES Joystick

NES Joystick/Game Controller

Note the weird 7-pin connector. You can buy sockets for this off eBay and if you currently own an old console, then you may wish to pursue this approach, but as I don’t own a console (and am unlikely to ever own one!) I decided to chop the connector off…

(Yes, sorry – if you’re a retro gaming enthusiast, I know you can now buy matching sockets for them, but I really didn’t want to go to the added expense, and I did leave a long enough tail on the plug so that I could re-connect it should I ever have the need…)

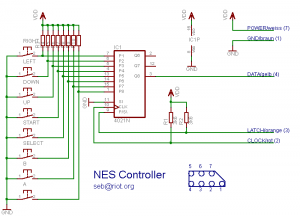
Inside, I found 5 wires… 5 wires and 8 buttons. Curious, but some googling later and I found this diagram:

NES Controller Schematic

NES Controller Schematic

Many thanks to Seb for letting me post it here.

And if you don’t read German, the colours on the diagram are (from the top down), White, Brown, Yellow, Orange and Red.

So what’s inside is a 4021N CMOS shift register. This has the task of sampling 8 buttons and then makes the data available via a serial interface controlled by 2 pins – a latch and a clock. The way it’s wired up requires one latch pulse and 7 clock pulses to get all 8 data bits out, but this is easily accomplished in software.

Some wire trimming, soldering and heat shrinking later and I end up with a pair of joysticks with pins on the ends:

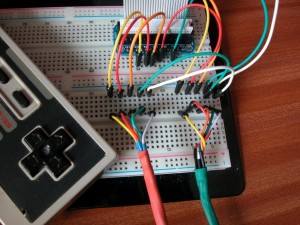
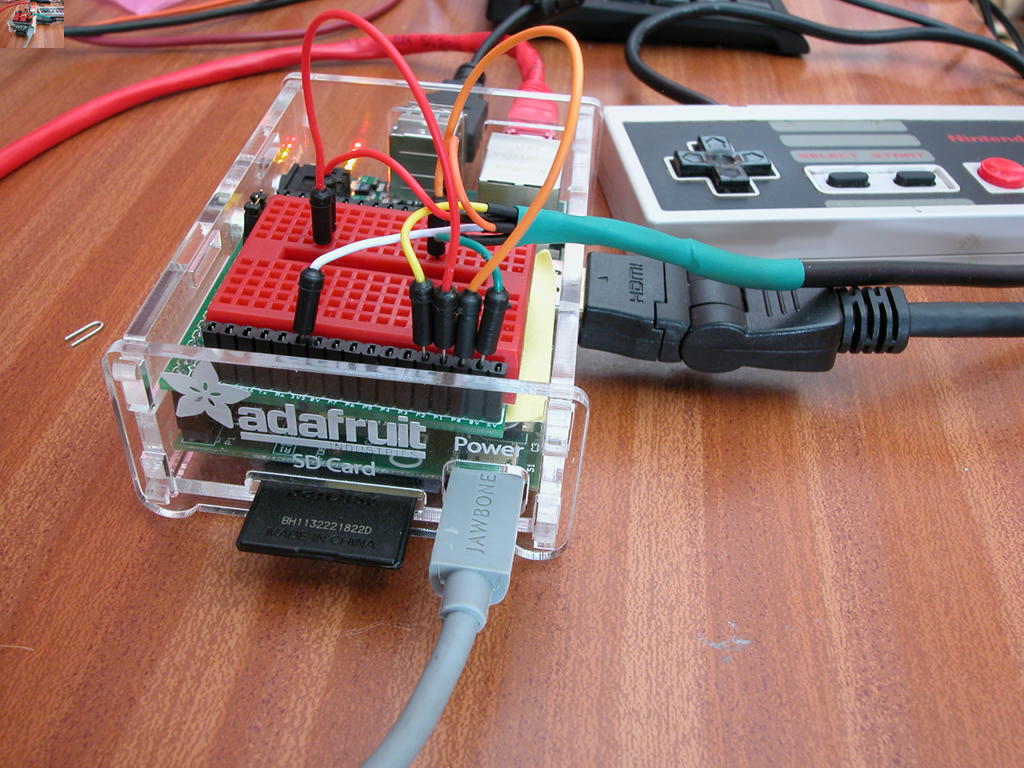
Two NES Controllers on a Pi

Two NES Controllers on a Pi

I took 5 short male/male breadboard patch leads, chopped them in half and soldered & heat-shrunk them on. I’d no brown patch leads, so I used green here. I’m using an Adafruit Cobler breakout just because it was next to me and already plugged into a Pi, but when I first developed it, I used the cute little Piio protoboard from DTRONIXS:

NES Controller on a Mini Piio Protoboard

NES Controller on a Mini Piio Protoboard

So you have plenty of options for hooking them up…

You could even make some sort of plug & socket arrangement and I may do just that in the near future too… The thing to note is that you have to split power (3.3v) to go to both controllers, then separate the 3 data/clock/latch pins…

In-theory the Pi can drive 5 Joysticks without any issues and I suspect (but haven’t tested it yet) that you can double up on the either the latch or clock pin, so 3 pins for the first controller, then 2 pins for each subsequent one, giving the possibility of connecting up 8 joysticks if you were really inclined to do so!

So I’ve catered for up to 8 joysticks in my driver code and made the code part of the wiringPi library. (It needs wiringPi to drive the GPIO pins anyway) The library is simple enough – firstly initialise wiringPi in either native pins mode, or GPIO mode (You can use Sys mode, but it’s really quite slow!), then call the NES controller setup code to tell it what pins to use, then you can read the controller. So:

#include <wiringPi.h>
#include <piNes.h>
...
 if (wiringPiSetupGpio () < 0)
  {
    fprintf (stderr, "Can't setup GPIO: %s\n", strerror (errno)) ;
    exit (1) ;
  }

// Data on pin 21, Clock on pin 18, Latch on pin 17
//    (BCM_GPIO pin numbers)

  if ((joystick = setupNesJoystick (21, 18, 17)) == -1)
  {
    fprintf (stderr, "Unable to setup joystick\n") ;
    return 1 ;
  }

  buttons = readNesJoystick (joystick) ;
  if ((buttons & NES_UP) != 0)
    // The Up button is being pushed

Do see the nes.c program in the examples directory and refer to the piNes.h file for the defined constants for each button. It is possible to read simultaneous multiple button pushes – the return from readNesJoystick is an 8-bit value with one bit set per button.

Now we have joysticks, we need a game, and to get something going quickly I used my BASIC and wrote a simple game of Pong (aka Tennis) which I’ll describe tomorrow!

Adafruit Protoplate for the Rasbperry Pi

As part of my Big Trak refurbishment (not going as well as I wanted it to), I decided to use the Adafruit Prototyping Pi Plate to mount the additional electronics on. If you’re not familiar with it, then this is it:

Adafruit Prototyping Pi Plate

Adafruit Prototyping Pi Plate

So it’s a double-sided PCB with a GPIO connector tracked to various pads round the outside of the board with space to solder in headers or screw-terminals (or both!), as well as having space in the middle to solder components to, supporting a standard DIL type layout, SOIC chip mounting pads and an open area.

An interesting feature is that it extends the GPIO pins through the board, giving the possibility for stacking – almost like an Arduino shield…

So for the Pi Trak, what I needed to do:

  • Power supply. Powering the Pi off batteries, I needed a regulator to feed a stable 5V supply into the Pi.
  • A motor controller. Essentially a dual H-bridge controller of some sort.
  • Interface from a wheel position sensor of some sort.
  • Interface to the keypad.

As I was running out of time to produce a prototype, I used a handy 7805 type regulator. This is great, but not too efficient – ie. it gets a bit hot when fed from 9v.

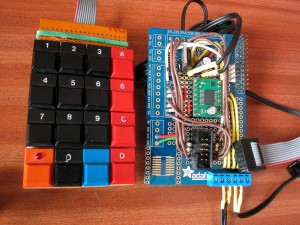
The keypad was originally going to be the Big Traks own keypad, but I substituted one I’d made earlier (some 25 years ago!) – it’s a simple 4×4 matrix and you can see 4 resistors on the protoboard. There is a 5th next to them which acts as a limiter for the LED that’s on one of the switches.

Keypad next to the Protoboard

Keypad next to the Protoboard

For the motor controller, I used the Pololu TB6612FNG unit which I bought locally via SKPang. (The Adafruit parts were supplied directly from the US, but note than SKPang now stock Adafruit components on the UK!)

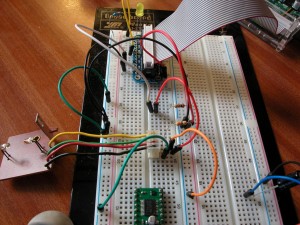
The wheel position sensor was an interesting one – initially I thought I could use a Lego sensor (since the rest of the thing was going to be made out of Lego by that point), however it turns out the Lego rotation sensor is analog – and outputs 4 different voltages depending on the angle… So a Plan B was hatched and I re-cycled the sensor from the original Big Track – seen here under test using the Adafruit Cobler board:

Using the Adafruit Cobler to test the wheel sensor

Using the Adafruit Cobler to test the wheel sensor

The wheel rotation sensor is the board to the left – it’s nothing more than an infra-red LED pointing to an IR photo diode. With a suitable current limiting resistor on the LED, the photo diode can be connected directly to one of the Pi’s GPIO inputs.

I also used to to test the motor driver too. I was a very easy way to do some “rapid prototyping” before committing to solder!

The end results was this:

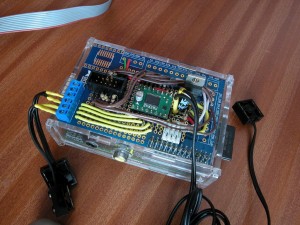
Raspberry Pi plus "PiTrak" Adafruit Protoboard

Raspberry Pi plus “PiTrak” Adafruit Protoboard

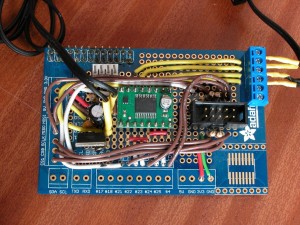
Closer view of the top of the PiTrak Controller

Closer view of the top of the PiTrak Controller

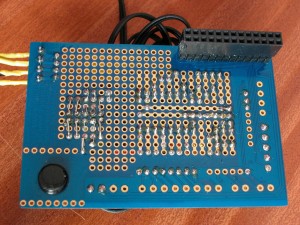
Solder Side of the PiTrak Controller

Solder Side of the PiTrak Controller

This was the first time I’d used a board like this – more often I’d build projects on a re-usable breadboard, or on stripboard, so it did pose a few issues which I’d never encountered – The DIL area where I mounted the voltage regulator and the motor controller seemed fairly straightforwards, but with hindsight, I’d have made some of the links to the +3.3v and 0v supplies under the motor controller! In the open area, I cheated and just bent the wires of the components over to touch the pins of the 8-way socket I’d soldered on. Is that cheating, or is it the way everyone else does it? (Sensible answers please!)

However, overall, the board was very easy to work with – and does look a lot more professional than just hacking together some stripboard, and combine the board with the Adafruit case as I’ve done here, and it does open up many more possibilities for Pi interfacing projects.

Finally:

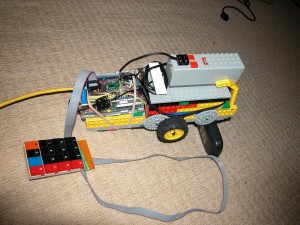
Lego PiTrak Mk.1

Lego PiTrak Mk.1

This is the Mk1 Lego PiTrak. Much room for improvement and I need to mount the keypad on it – also want to put on an LCD display, so watch this space as they say…

Bristol RaspberryJam

Just a quick post and a few photos from last nights RaspberryJam in Bristol – held in the most excellent Bristol and Bath Science Park.

Alan (@teknoteacher) the driving force behind the RaspberryJams, was on-form as usual, keeping everything flowing nicely with his usual jokes, and while I didn’t count the people, there seemed to be well over 100 attending! There was a nice time to do some networking before the main event (spread the jam as Alan says!), then the talks then a big break-out session afterwards with people showing off what they’re doing with their Pi’s and so on.

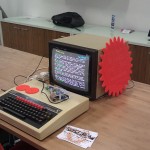
I did a one of the talks, and while it wasn’t quite fully what I’d planned, due to some technical hitches before-hand with Keith Dunlops presentation – all about RiscOS on the Pi…

(The Pi is a bit of a fussy little beast which won’t normally output to HDMI when it doesn’t detect a “live” HDMI display connected to it, so when you connect a Pi into a fancy multi-switching input thingy, unless the switch is set to take the HDMI input, then the Pi won’t boot up in HDMI mode!)

However after that delay, as Keith often ends his talk with BBC BASIC running under RiscOS on the Pi, I cut my talk a little short and spoke more about my BASIC than what I’d fully planned to speak about – however the essence of what I was going to saw was that programming (or Software engineering!) isn’t just about glitzy/glamorous web “apps” with shiny graphics and fancy buttons… Programming also encompasses a lot more – which some people think is boring, but others (like me) find much more exciting – and that’s the world of computer control.

I also think of myself as a Programmer or Software Engineer. I’m not a developer – I’ll leave that term for the airy fairy web people 😉

So, someone, somewhere has to write the code that drives the braking system on your car, the engine management and so on. Someone has to write the low-level software for your hand held GPS, your microwave, your washing machine, etc. Someone (or probably some team!) wrote the software for the Mars Curiosity robot – now there’s a project you can’t afford to get wrong!

And if you’re wondering who wrote the software for some of these things, and thinking it’s some underpaid chap in India or China, then think again – Heber who hosted the RaspberryJam last night is based in the UK, manufacture their own control boards (in the UK!) and write software for things as diverse as vending machines to the Dyson Washing machine!

Here’s a few photos from the evening:


Links to other peoples photos, etc.: